Self-Hostember #13: Netbird - Your own private internet
Table of Contents
ℹ️ This post is part of a series , and it assumes that you’ve followed the instructions from Day Zero first.
Internet… with birds?
A tail, with scales? Fauna seems to be a popular inspiration for these overlay VPN providers. If you are wondering what the hell I am talking about, I don’t blame you. To be absurdly reductive:
- VPN: Virtual private network, like OpenVPN. You probably already know this
- Overlay: Because they run over non-private physical or virtual networks
In an abstract sense this allows us to establish secure connections between computers over untrusted networks, like the public internet.
In a concrete sense, this allows you to access your self-hosted services over the public internet without exposing them to the rest of the world. These networks maintain privacy generally by public key cryptography, so you don’t want to invite untrusted parties, but for things you only want to share with your friends and family this is the most secure way to do it, as we noted previously .
If both sides of the connection have stable public IPs, then this can also be accomplished using Wireguard - the underlying technology. However, if one side is behind a residential connection, it is likely behind some kind of NAT - and then NAT traversal techniques become necessary, and higher-level tools prove their worth.
Tailscale is by far the most popular service in this space, and you probably have heard about them if you have ever had the misfortune to visit HackerNews. They are a very good service and you should try them if you feel comfortable with either trusting them with hosting the coordination service or are comfortable running a third-party open-source coordination server like Headscale because their coordination server is not open-source (almost everything else is, to be fair to them).
Cloudflare Tunnels is also built upon similar concepts, although it is a more focused product for tunneling public traffic into a private network. (Also enough of the internet already depends on Cloudflare, so no need to add to it.)
However, today we are going to check out Netbird , which does have an open-source coordination server. Netbird licenses the coordination server and some other coordinating parts (e.g. the management UI) under AGPLv3 while everything else under BSD-3-Clause, which is quite fair for a project meant to also power a business.
The main components of Netbird are written in Go, so building and deploying static binaries are quite easy. However, we are continuing the cursed blessed tradition of installing things inside Docker.
We will install three things:
- A control plane (this includes the Netbird Management Service, Management UI, a STUN/TURN server for NAT traversal)
- Client A
- Client B
Netbird also requires an auth service, but we already installed PocketID , so we will use that.
Client A and B will form a direct connection to each other, while the coordination server will provide authentication and management. We will verify that it all works.
Install Netbird with Docker
Configure authentication on PocketID
Before we begin with our Netbird install, we should prepare the authentication details it will use. On PocketID this is done by creating a new OIDC client and saving the credentials securely.
This is similar to the setup we did for Dawarich , but slightly different in that the client is public and the authentication is actually handled via an API key.
There is not much point repeating the steps outlined in the Netbird docs , so I will wait till you’ve come back from that, with credentials in hand for the next stage.
Installing the control plane
Let’s set the stage! On your VM/VPS/homelab server:
mkdir -p netbird/data
cd netbird
Then, let’s clone the (currently) latest tag of the netbird repo in there.
git clone --depth 1 --branch v0.60.8 https://github.com/netbirdio/netbird
Then we switch to the directory containing the docker-compose templates.
cd netbird/infrastructure_files/
Since Netbird has many moving parts, they very kindly provide a templating system to generate the correct docker-compose given the config values, so we are going to use that instead of writing it by hand and tweak it later.
cp setup.env.example setup.env
And make the changes from the PocketID setup step above, along with configuring the domain:
diff --git a/setup.env b/setup.env
index 382e1e1..3e60324 100644
--- a/setup.env
+++ b/setup.env
@@ -10,7 +10,7 @@ COTURN_TAG=""
 NETBIRD_RELAY_TAG=""

 # Dashboard domain. e.g. app.mydomain.com
-NETBIRD_DOMAIN=""
+NETBIRD_DOMAIN="netbird.domain.tld"

 # TURN server domain. e.g. turn.mydomain.com
 # if not specified it will assume NETBIRD_DOMAIN
@@ -26,15 +26,15 @@ NETBIRD_TURN_EXTERNAL_IP=""
 # OIDC
 #  e.g., https://example.eu.auth0.com/.well-known/openid-configuration
 # -------------------------------------------
-NETBIRD_AUTH_OIDC_CONFIGURATION_ENDPOINT=""
+NETBIRD_AUTH_OIDC_CONFIGURATION_ENDPOINT="https://auth.domain.tld/.well-known/openid-configuration"
 # The default setting is to transmit the audience to the IDP during authorization. However,
 # if your IDP does not have this capability, you can turn this off by setting it to false.
 #NETBIRD_DASH_AUTH_USE_AUDIENCE=false
-NETBIRD_AUTH_AUDIENCE=""
+NETBIRD_AUTH_AUDIENCE="<Client ID>"
 # e.g. netbird-client
-NETBIRD_AUTH_CLIENT_ID=""
+NETBIRD_AUTH_CLIENT_ID="<Client ID>"
 # indicates the scopes that will be requested to the IDP
-NETBIRD_AUTH_SUPPORTED_SCOPES=""
+NETBIRD_AUTH_SUPPORTED_SCOPES="openid profile email groups"
 # NETBIRD_AUTH_CLIENT_SECRET is required only by Google workspace.
 # NETBIRD_AUTH_CLIENT_SECRET=""
 # if you want to use a custom claim for the user ID instead of 'sub', set it here
@@ -43,21 +43,21 @@ NETBIRD_AUTH_SUPPORTED_SCOPES=""
 NETBIRD_USE_AUTH0="false"
 # if your IDP provider doesn't support fragmented URIs, configure custom
 # redirect and silent redirect URIs, these will be concatenated into your NETBIRD_DOMAIN domain.
-# NETBIRD_AUTH_REDIRECT_URI="/peers"
-# NETBIRD_AUTH_SILENT_REDIRECT_URI="/add-peers"
+NETBIRD_AUTH_REDIRECT_URI="/auth"
+NETBIRD_AUTH_SILENT_REDIRECT_URI="/silent-auth"
 # Updates the preference to use id tokens instead of access token on dashboard
 # Okta and Gitlab IDPs can benefit from this
-# NETBIRD_TOKEN_SOURCE="idToken"
+NETBIRD_TOKEN_SOURCE="idToken"
 # -------------------------------------------
 # OIDC Device Authorization Flow
 # -------------------------------------------
 NETBIRD_AUTH_DEVICE_AUTH_PROVIDER="none"
-NETBIRD_AUTH_DEVICE_AUTH_CLIENT_ID=""
+NETBIRD_AUTH_DEVICE_AUTH_CLIENT_ID="<Client ID>"
 # Some IDPs requires different audience, scopes and to use id token for device authorization flow
 # you can customize here:
 NETBIRD_AUTH_DEVICE_AUTH_AUDIENCE=$NETBIRD_AUTH_AUDIENCE
-NETBIRD_AUTH_DEVICE_AUTH_SCOPE="openid"
-NETBIRD_AUTH_DEVICE_AUTH_USE_ID_TOKEN=false
+NETBIRD_AUTH_DEVICE_AUTH_SCOPE="openid profile email groups"
+NETBIRD_AUTH_DEVICE_AUTH_USE_ID_TOKEN=true
 # -------------------------------------------
 # OIDC PKCE Authorization Flow
 # -------------------------------------------
@@ -68,12 +68,13 @@ NETBIRD_AUTH_PKCE_REDIRECT_URL_PORTS="53000"
 # IDP Management
 # -------------------------------------------
 # eg. zitadel, auth0, azure, keycloak
-NETBIRD_MGMT_IDP="none"
+NETBIRD_MGMT_IDP="pocketid"
 # Some IDPs requires different client id and client secret for management api
-NETBIRD_IDP_MGMT_CLIENT_ID=$NETBIRD_AUTH_CLIENT_ID
+NETBIRD_IDP_MGMT_CLIENT_ID="netbird"
 # Required when setting up with Keycloak "https://<YOUR_KEYCLOAK_HOST_AND_PORT>/admin/realms/netbird"
-# NETBIRD_IDP_MGMT_EXTRA_ADMIN_ENDPOINT=
+NETBIRD_IDP_MGMT_EXTRA_MANAGEMENT_ENDPOINT="https://auth.domain.tld"
+NETBIRD_IDP_MGMT_EXTRA_API_TOKEN="<API token>"
 # With some IDPs may be needed enabling automatic refresh of signing keys on expire
 # NETBIRD_MGMT_IDP_SIGNKEY_REFRESH=false
 # NETBIRD_IDP_MGMT_EXTRA_ variables. See https://docs.netbird.io/selfhosted/identity-providers for more information about your IDP of choice.
Oof, that’s a lot. But let’s generate the actual docker-compose now.
./configure.sh
This will create a bunch of files in artifacts
pawan@playground:~/s/netbird/netbird/infrastructure_files$ ls -alh artifacts/
total 48K
drwxrwxr-x 2 pawan pawan    7 Dec 21 23:02 .
drwxrwxr-x 5 pawan pawan   15 Dec 21 23:04 ..
-rw-rw-r-- 1 pawan pawan    0 Dec 21 22:33 .gitkeep
-rw-rw-r-- 1 pawan pawan 3.1K Dec 21 23:02 docker-compose.yml
-rw-rw-r-- 1 pawan pawan 3.1K Dec 21 23:02 management.json
-rw-rw-r-- 1 pawan pawan 1.1K Dec 21 23:02 openid-configuration.json
-rw-rw-r-- 1 pawan pawan  26K Dec 21 23:02 turnserver.conf
In the generated docker-compose.yml, we will make one change to bind all ports to the loopback address only for security. We will also make the dashboard bind to non-80/443 ports locally since Caddy is handling that for us.
# Example
ports:
  - 127.0.0.1:8090:80
  - 127.0.0.1:9443:443
And we will also modify the endpoints to target our domain, rather than a specific port.
@@ -16,8 +16,8 @@ services:
       - 127.0.0.1:9443:443
     environment:
       # Endpoints
-      - NETBIRD_MGMT_API_ENDPOINT=https://netbird.domain.tld:33073
-      - NETBIRD_MGMT_GRPC_API_ENDPOINT=https://netbird.domain.tld:33073
+      - NETBIRD_MGMT_API_ENDPOINT=https://netbird.domain.tld
+      - NETBIRD_MGMT_GRPC_API_ENDPOINT=https://netbird.domain.tld
       # OIDC
       - AUTH_AUDIENCE=<your-client-id>
       - AUTH_CLIENT_ID=<your-client-id>
@@ -63,9 +63,9 @@ services:
     environment:
     - NB_LOG_LEVEL=info
     - NB_LISTEN_ADDRESS=:33080
-    - NB_EXPOSED_ADDRESS=rels://netbird.domain.tld:33080/relay
+    - NB_EXPOSED_ADDRESS=rels://netbird.domain.tld/relay
     # todo: change to a secure secret
We can also modify the docker-compose.yml.tmpl file in the parent directory to persist these changes so that a future invocation of ./configure does not overwrite them with bad values.
We also need to change one thing in artifacts/management.json, changing Signal->Proto to https from http
    "Signal": {
        "Proto": "https",
We are almost ready to start the docker containers. But first, let’s modify the Caddy config to support the endpoints. This is adapted from various online examples.
{
        debug
        servers :80,:443 {
                protocols h1 h2c h2 h3
        }
}

<snip>

*.domain.tld, domain.tld {
        @netbird host netbird.domain.tld
        handle @netbird {
                header * {
                        Strict-Transport-Security "max-age=3600; includeSubDomains; preload"
                        X-Content-Type-Options "nosniff"
                        X-Frame-Options "SAMEORIGIN"
                        X-XSS-Protection "1; mode=block"
                        -Server
                        Referrer-Policy strict-origin-when-cross-origin
                }

                # relay
                reverse_proxy /relay* 127.0.0.1:33080
                # Signal
                reverse_proxy /ws-proxy/signal* 127.0.0.1:10000
                reverse_proxy /signalexchange.SignalExchange/* h2c://127.0.0.1:10000
                # Management
                reverse_proxy /api/* 127.0.0.1:33073
                reverse_proxy /ws-proxy/management* 127.0.0.1:33073
                reverse_proxy /management.ManagementService/* h2c://127.0.0.1:33073
                # Dashboard
                reverse_proxy /* 127.0.0.1:8090
        }
}
Then a systemctl reload caddy will apply the changes. Now let’s start up the containers!
cd artifacts
docker compose up -d
We should see them start up. We wait till all of them are healthy.
docker compose ps
NAME                     IMAGE                         COMMAND                  SERVICE      CREATED          STATUS         PORTS
artifacts-coturn-1       coturn/coturn:latest          "docker-entrypoint.s…"   coturn       13 seconds ago   Up 8 seconds
artifacts-dashboard-1    netbirdio/dashboard:latest    "/usr/bin/supervisor…"   dashboard    13 seconds ago   Up 8 seconds   127.0.0.1:8090->80/tcp, 127.0.0.1:9443->443/tcp
artifacts-management-1   netbirdio/management:latest   "/go/bin/netbird-mgm…"   management   13 seconds ago   Up 7 seconds   127.0.0.1:33073->443/tcp
artifacts-relay-1        netbirdio/relay:latest        "/go/bin/netbird-rel…"   relay        13 seconds ago   Up 8 seconds   127.0.0.1:33080->33080/tcp
artifacts-signal-1       netbirdio/signal:latest       "/go/bin/netbird-sig…"   signal       13 seconds ago   Up 7 seconds   127.0.0.1:10000->80/tcp
Setting up the control plane
Once the containers are up, navigating to the configured domain in your browser should ask you to auth with PocketID - this means that things are working!
On successful authentication, you should be redirected to the onboarding flow, which looks very polished.
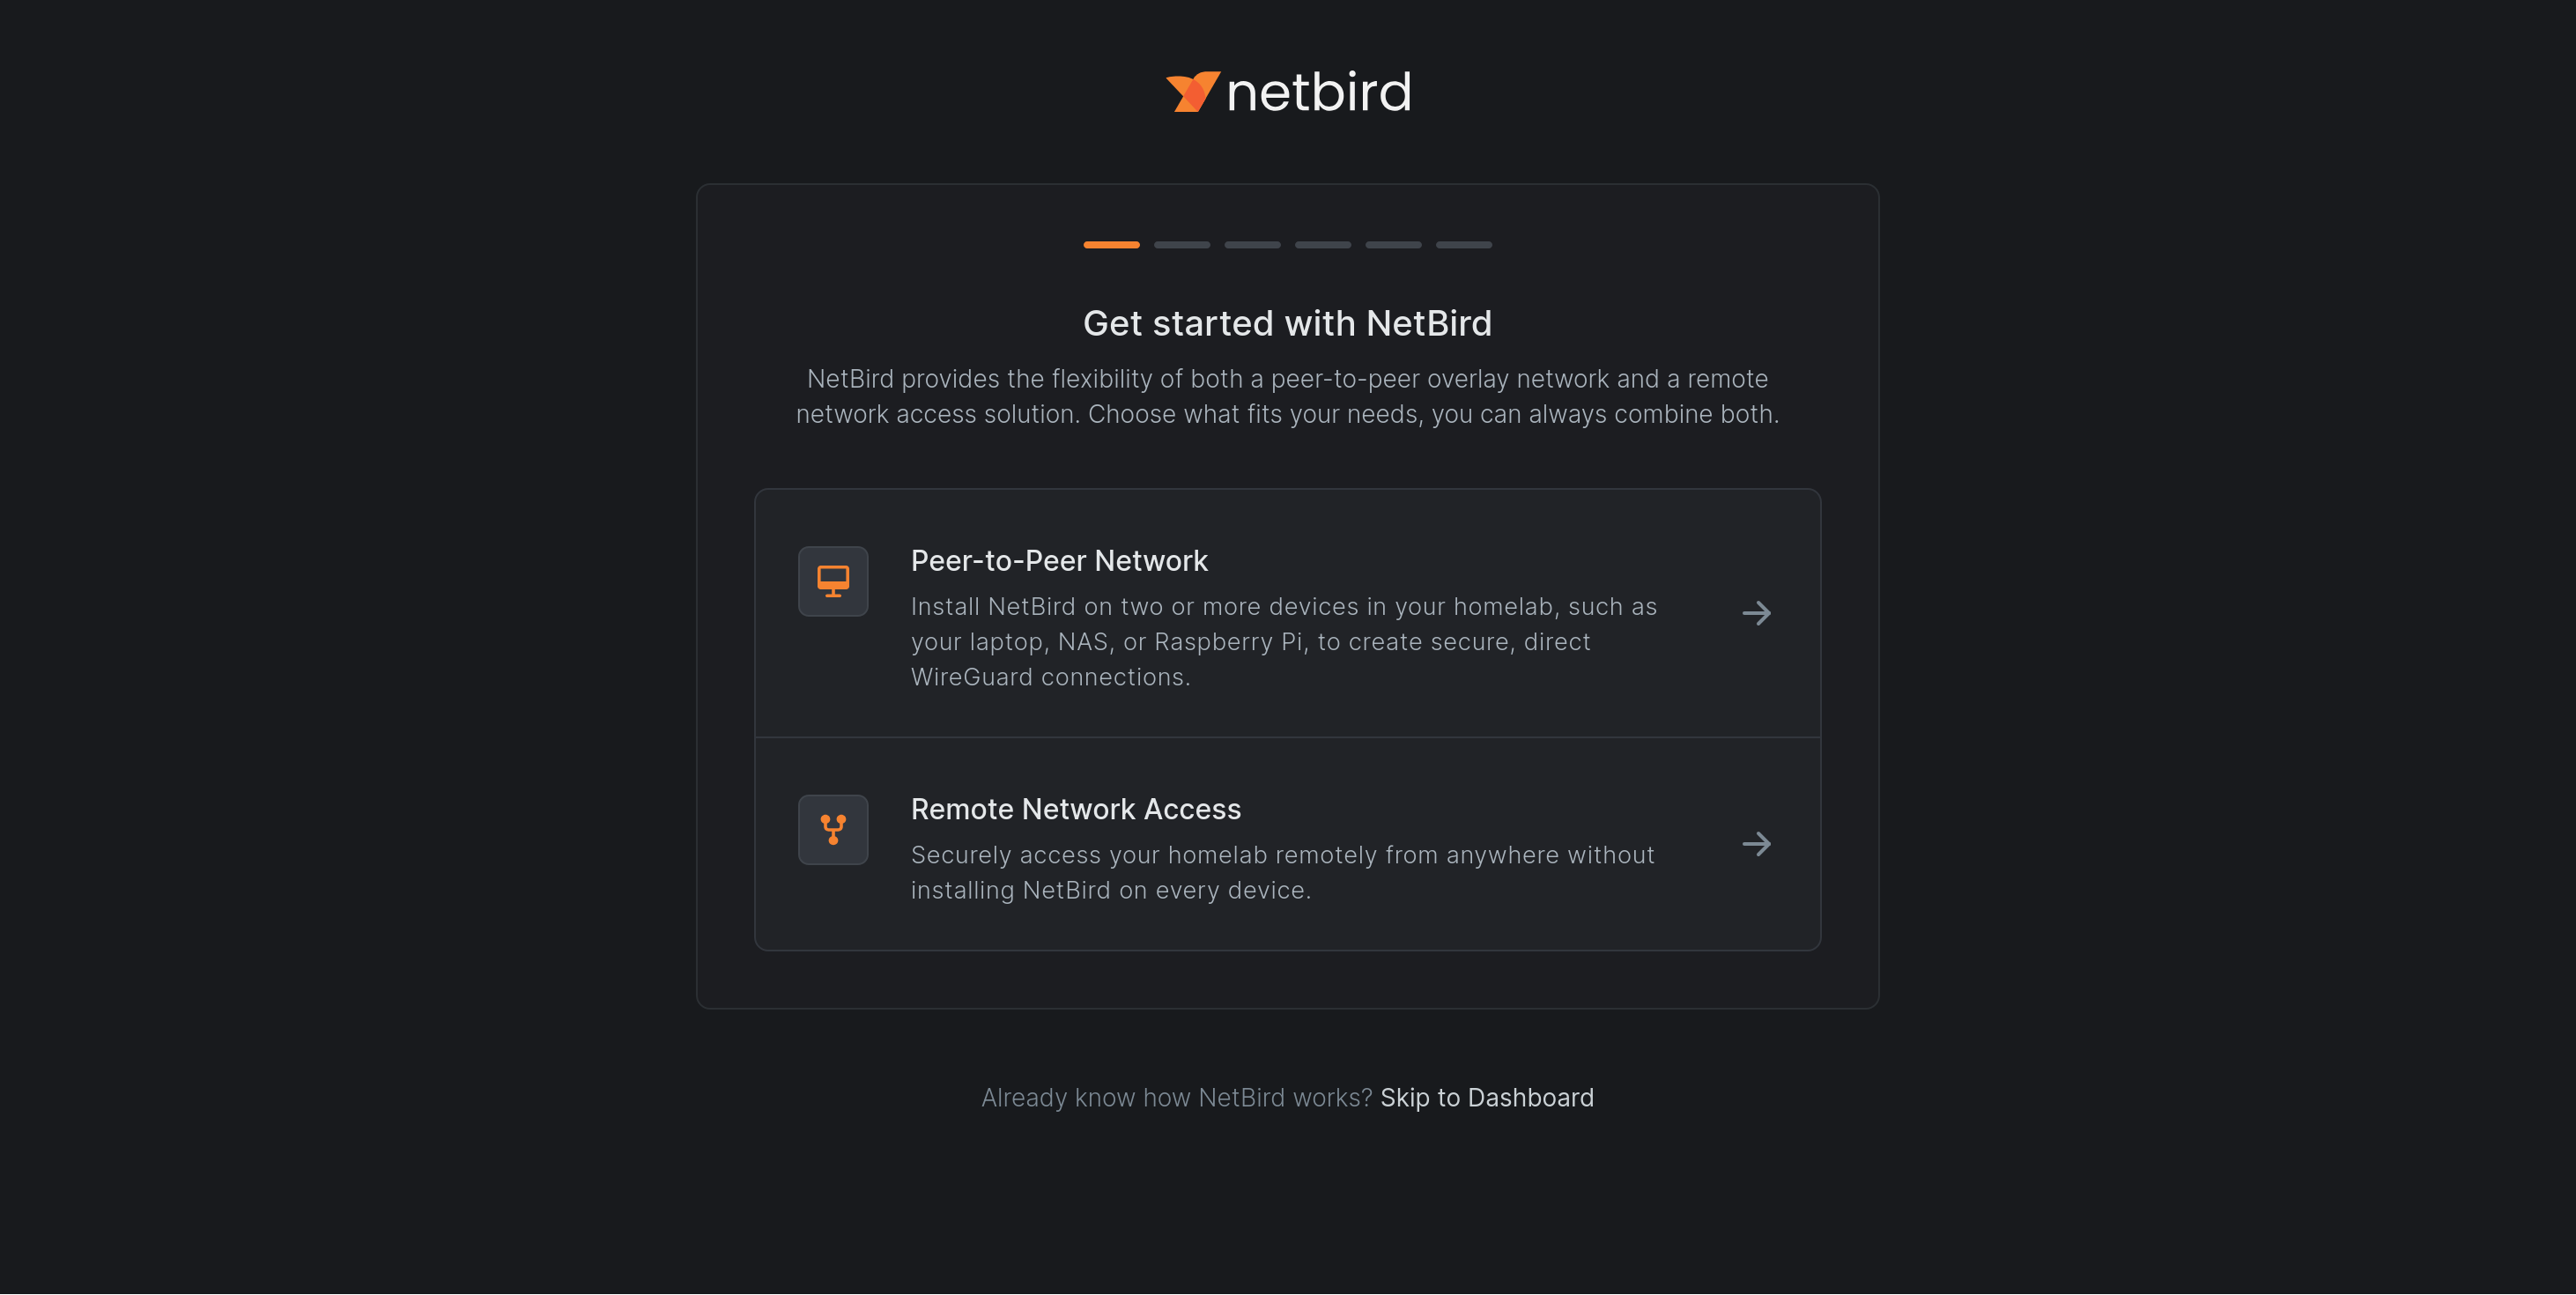
For today we will choose the peer-to-peer option instead of remote access. On selecting that option, we are redirected to a page that asks us to install the Netbird client on the devices, which leads us to the next part!
Installing the clients
Laptop
For demonstration, I will install Netbird on the Thinkpad I’m writing this post from, as well as my Google Pixel. Let’s start with the laptop.
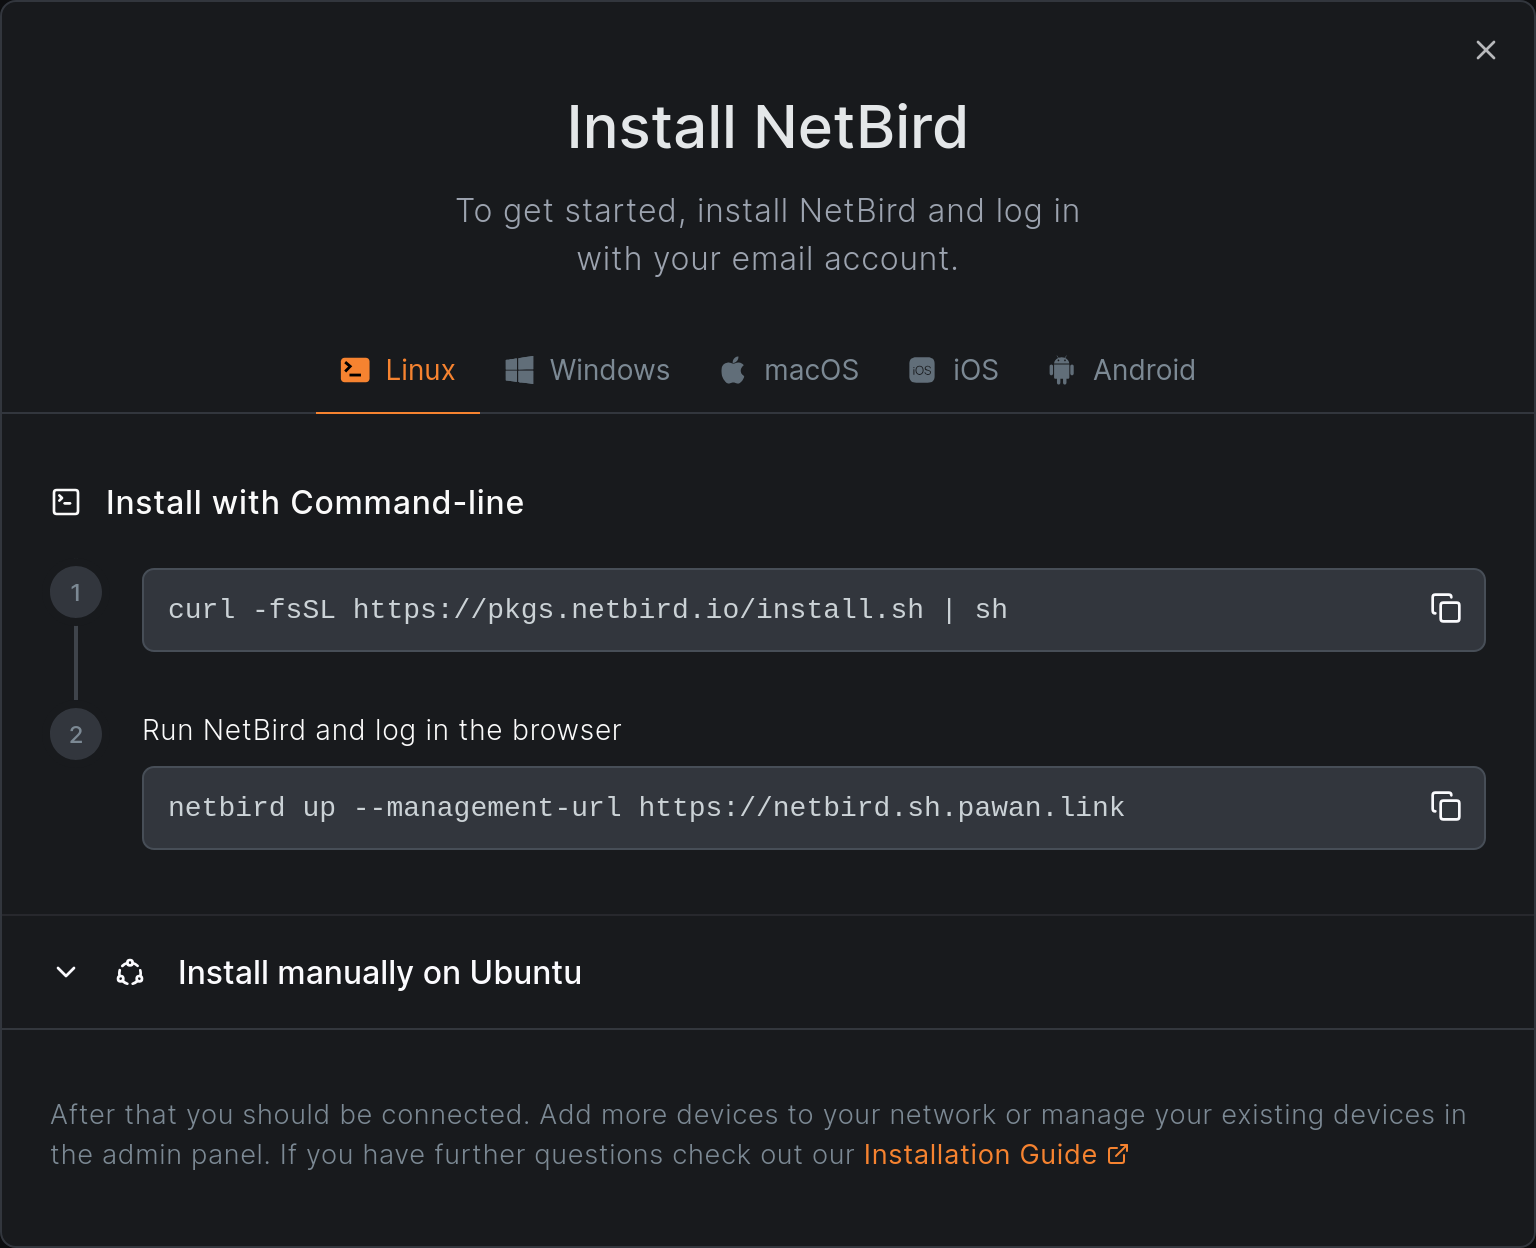
Clicking on the install button gives us a nice popup modal with directions. I am on Linux (obviously), so I’ll follow their manual instructions for Ubuntu because I’m too paranoid to pipe curl into bash.
sudo apt install ca-certificates curl gnupg -y
curl -sSL https://pkgs.netbird.io/debian/public.key | sudo gpg --dearmor --output /usr/share/keyrings/netbird-archive-keyring.gpg
echo 'deb [signed-by=/usr/share/keyrings/netbird-archive-keyring.gpg] https://pkgs.netbird.io/debian stable main' | sudo tee /etc/apt/sources.list.d/netbird.list
sudo apt update
    sudo apt install netbird netbird-ui
And then we’ll login to the network.
netbird up --management-url https://netbird.domain.tld
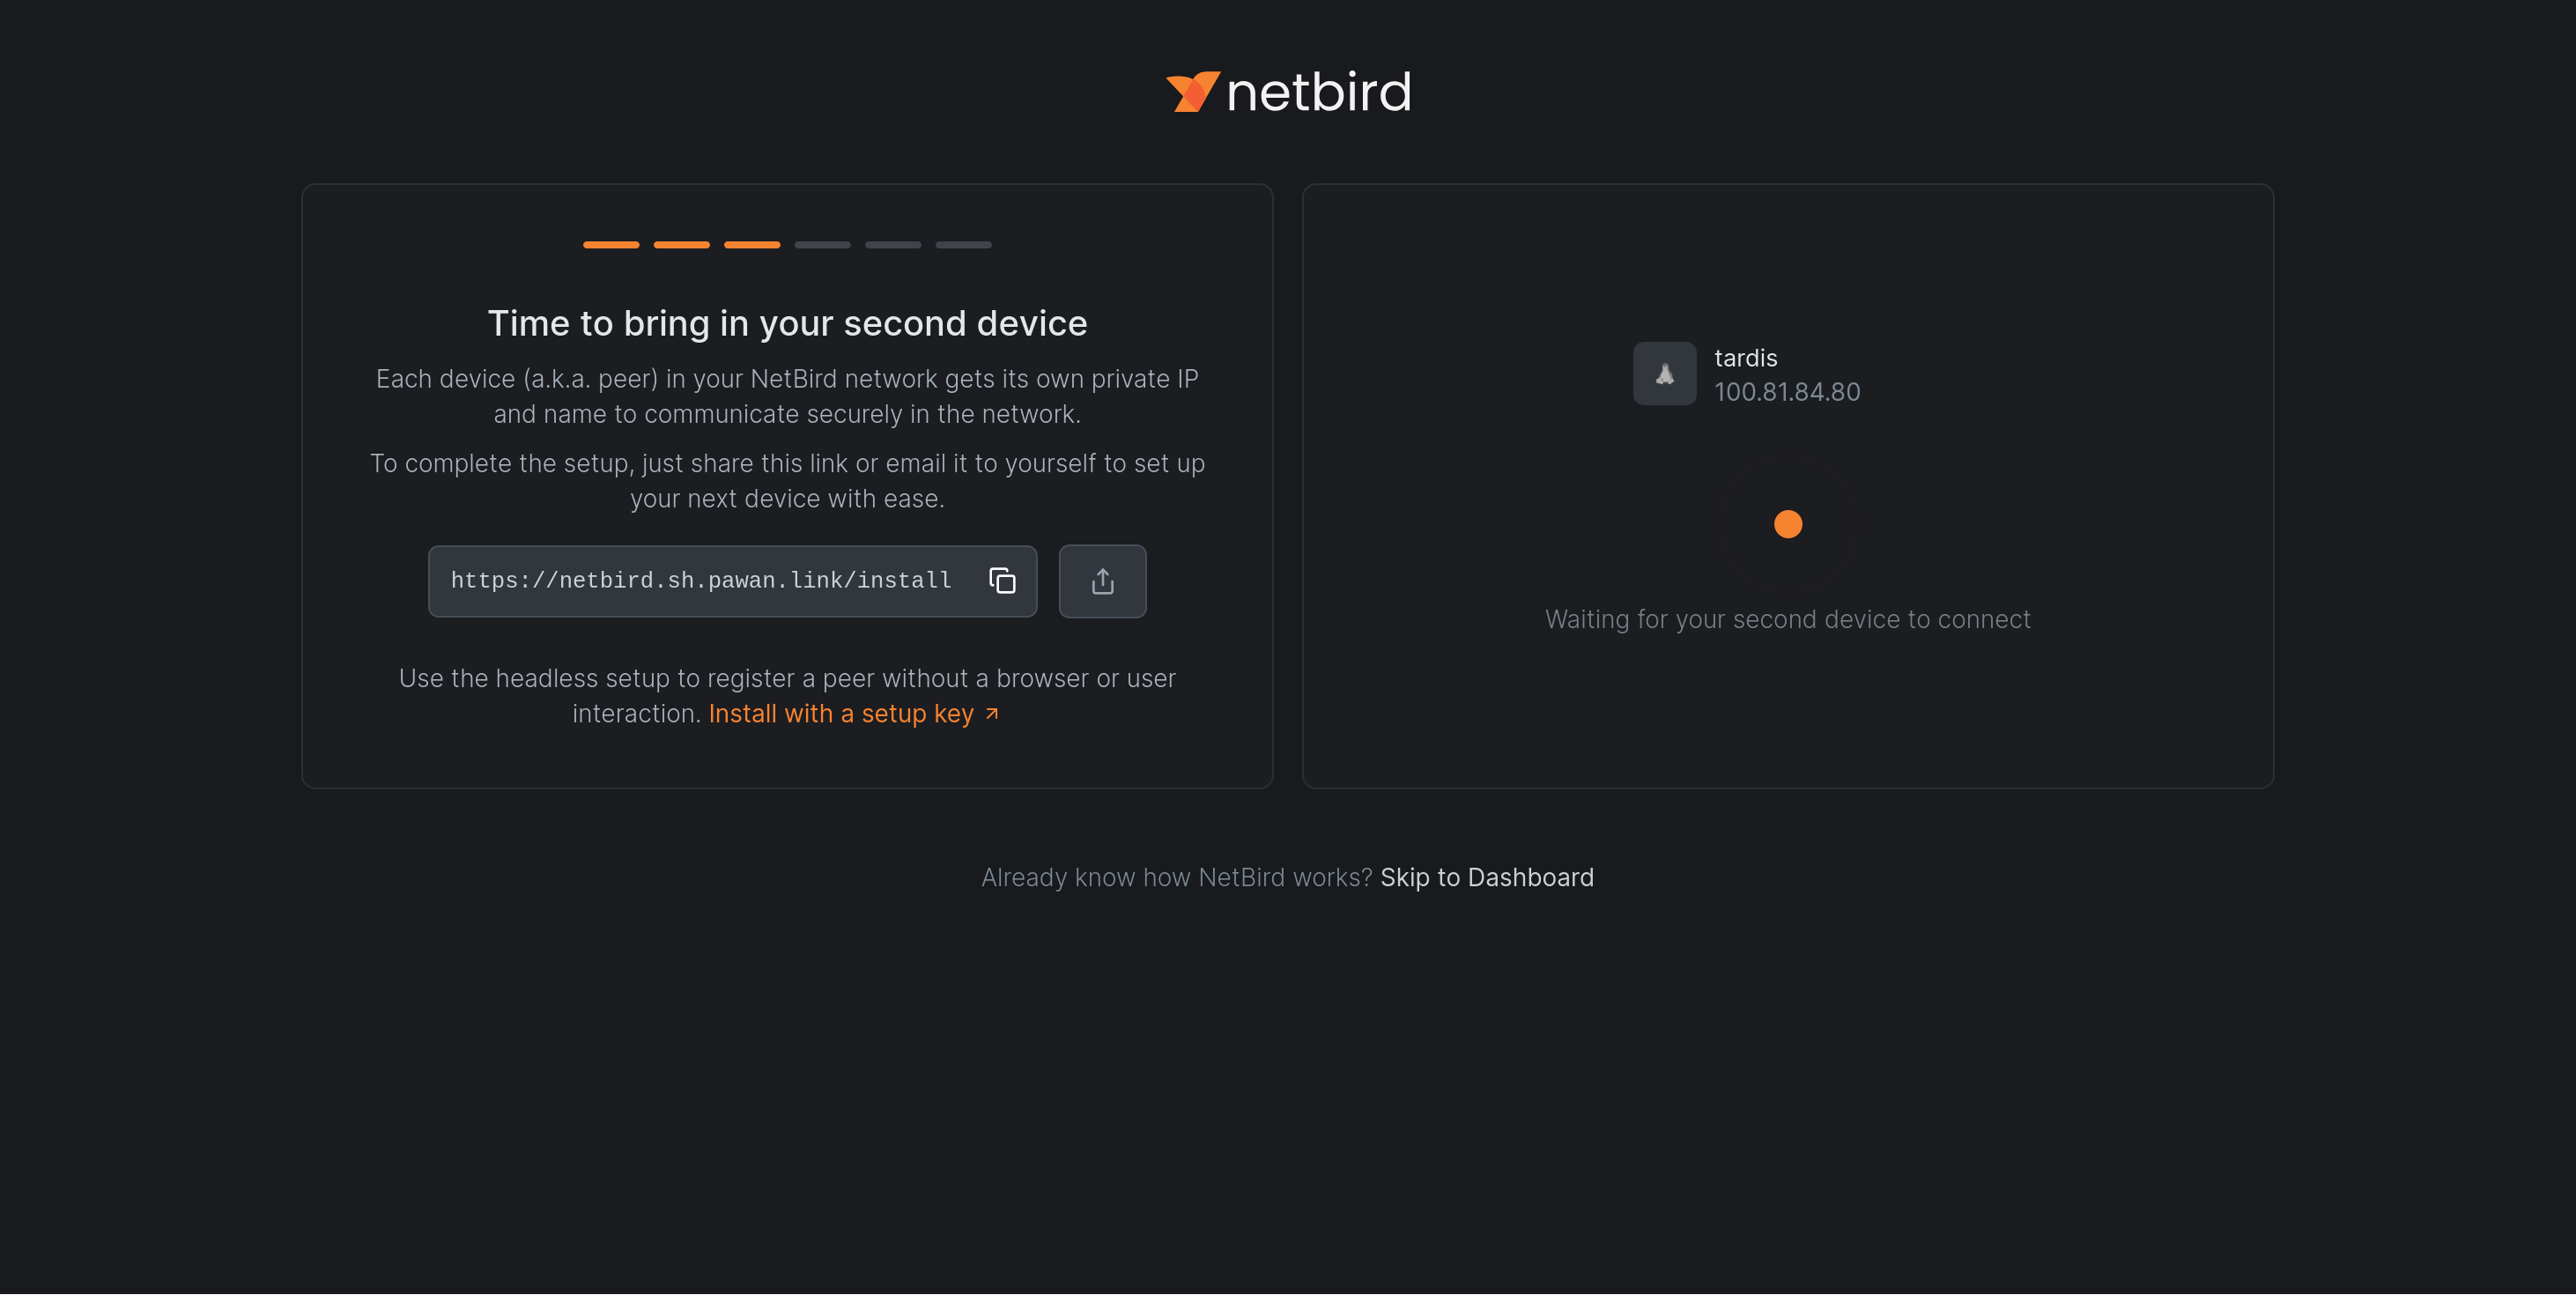
And this is where I hit a snag: the PocketID OIDC client needs to be configured with a callback URI of localhost:53000 as well for the auth link generated by that command to work. Good news is that it can be modified in the PocketID UI easily. After that change, the authentication succeeded and the waiting page changed to show my newly registered client.
Netbird will create a new network interface (it created wt0 for me):
ip a
21: wt0: <POINTOPOINT,NOARP,UP,LOWER_UP> mtu 1280 qdisc noqueue state UNKNOWN group default qlen 1000
    link/none
    inet 100.81.52.123/16 brd 100.81.255.255 scope global wt0
       valid_lft forever preferred_lft forever
If we inspect it, we can see that it’s a wireguard device. Nice!
ip -d link show wt0
21: wt0: <POINTOPOINT,NOARP,UP,LOWER_UP> mtu 1280 qdisc noqueue state UNKNOWN mode DEFAULT group default qlen 1000
    link/none  promiscuity 0 allmulti 0 minmtu 0 maxmtu 2147483552
    wireguard addrgenmode none numtxqueues 1 numrxqueues 1 gso_max_size 65536 gso_max_segs 65535 tso_max_size 524280 tso_max_segs 65535 gro_max_size 65536 gso_ipv4_max_size 65536 gro_ipv4_max_size 65536
And we have a default route for that subnet:
ip route
default via 192.168.1.1 dev wlp4s0 proto dhcp src 192.168.1.239 metric 600
100.81.0.0/16 dev wt0 proto kernel scope link src 100.81.52.123
So far, we are the only connected peer, which is not very useful. Let’s add a second!
Phone
Installing Netbird on Android is a little bit less involved. The UI helpfully links to the app store page, as well as gives directions to the modifications required. We only need to change one thing: point to our self-hosted management server.
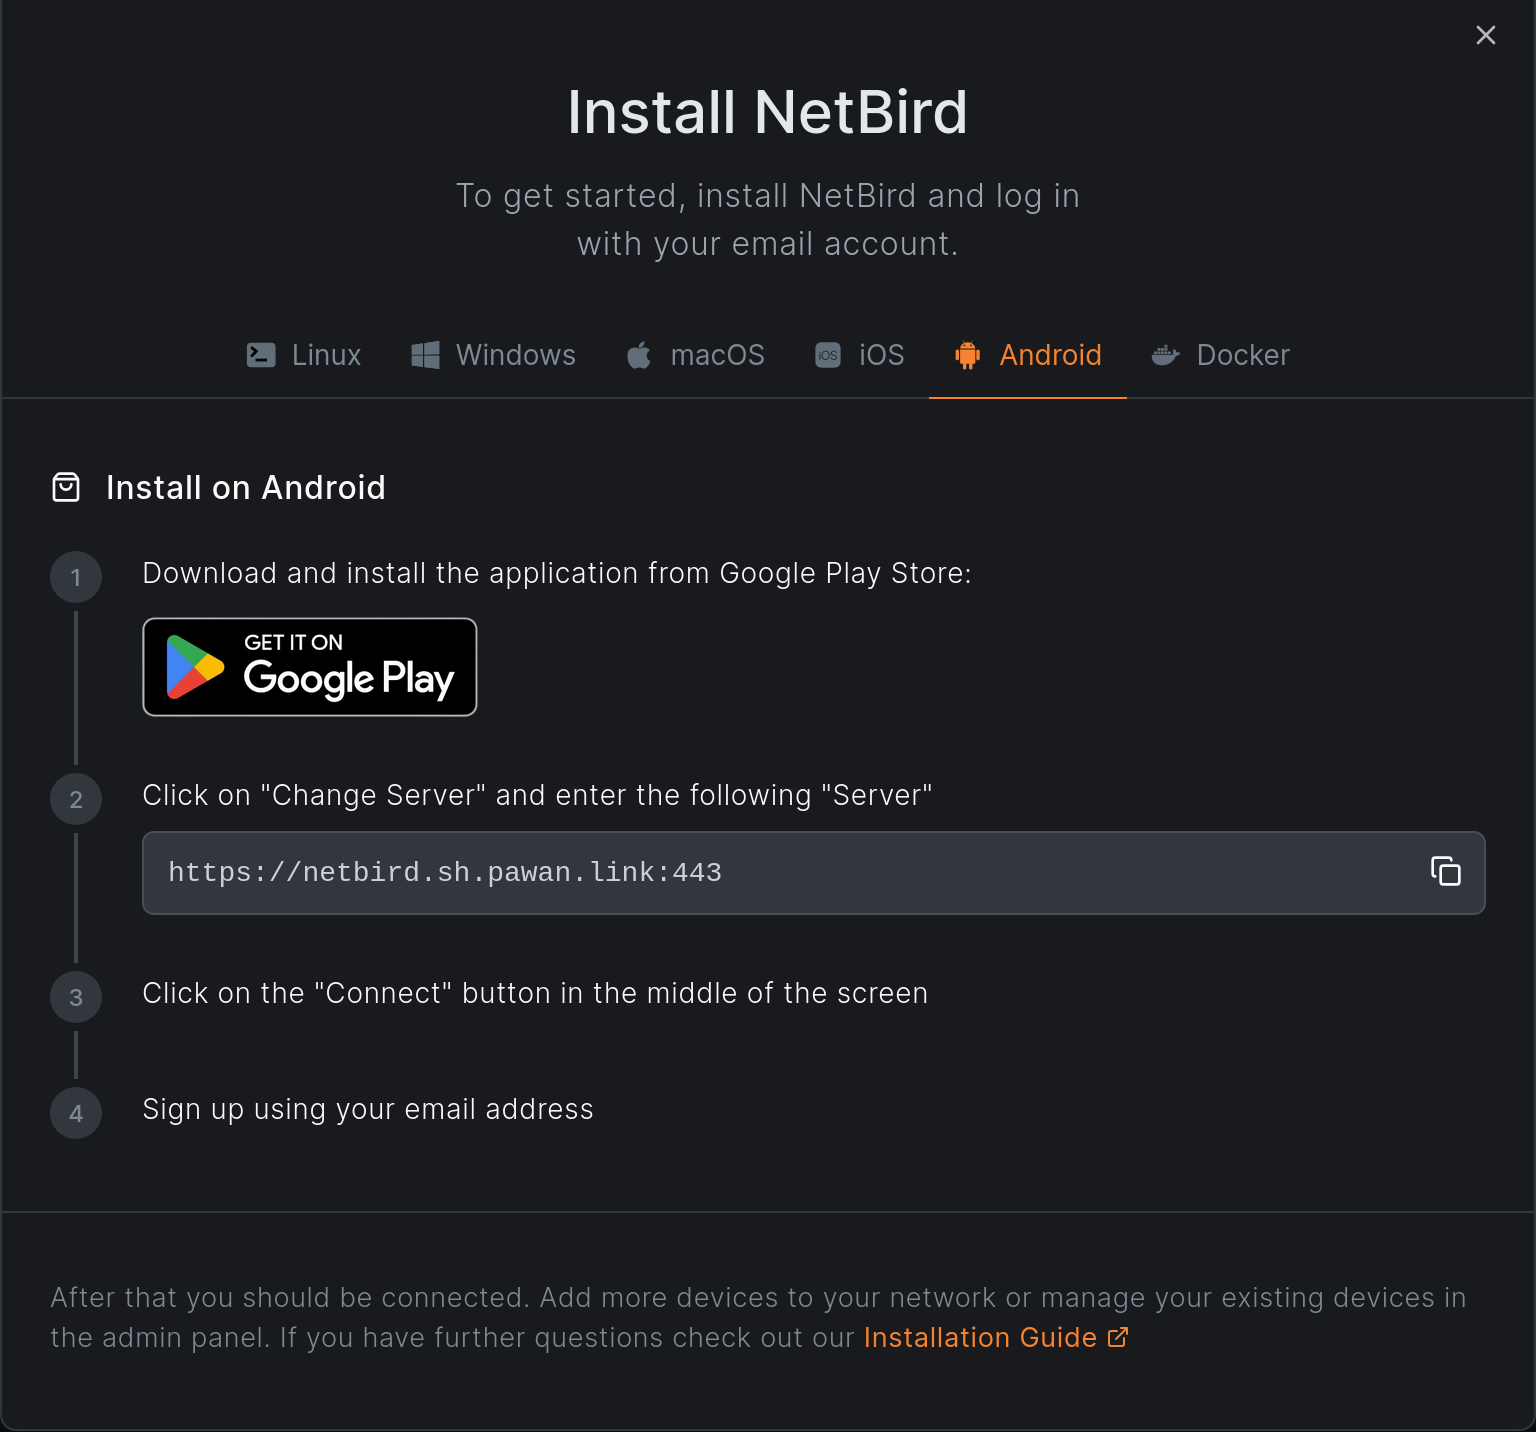
After installing and changing the server address, hitting the big connect button redirected me to Pocket ID. Success! Authentication goes as you expect - if you already added your phone as an authenticator to it then this is a two-click process.


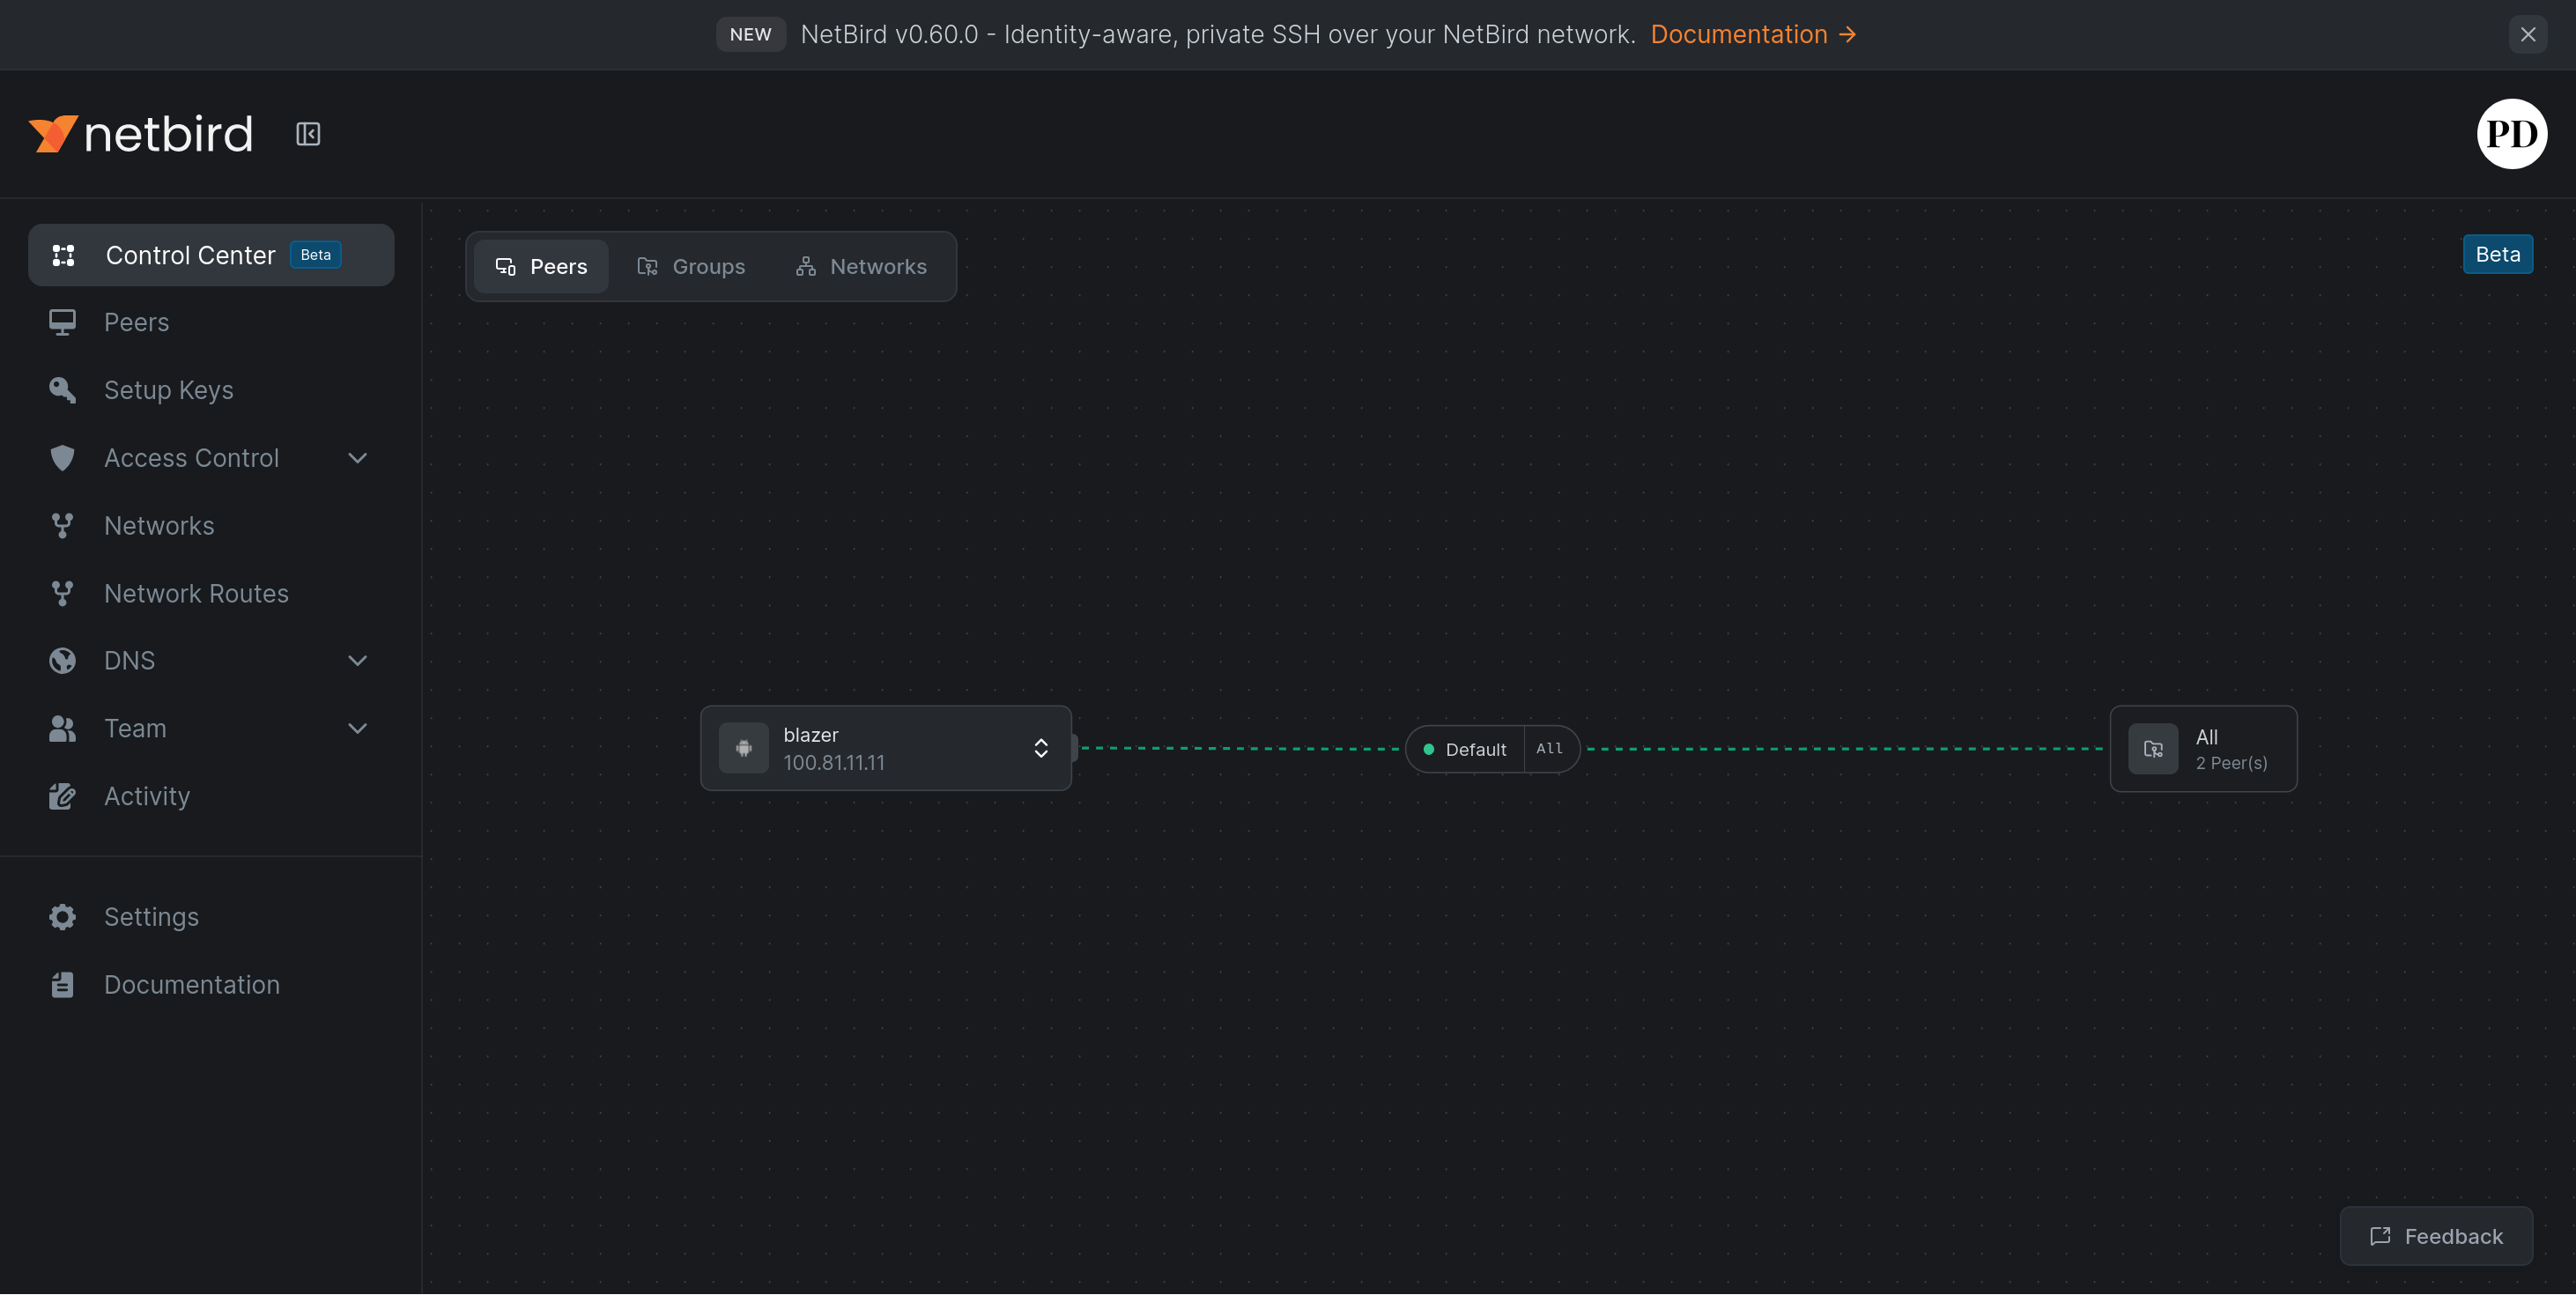
Once we are connected on the phone, we can navigate to the Netbird dashboard which has a nice UI showing the peers and connections between them. (Don’t worry, we can add more peers later).
Exploring the dashboard
A more “boring” table is available on the Peers page:
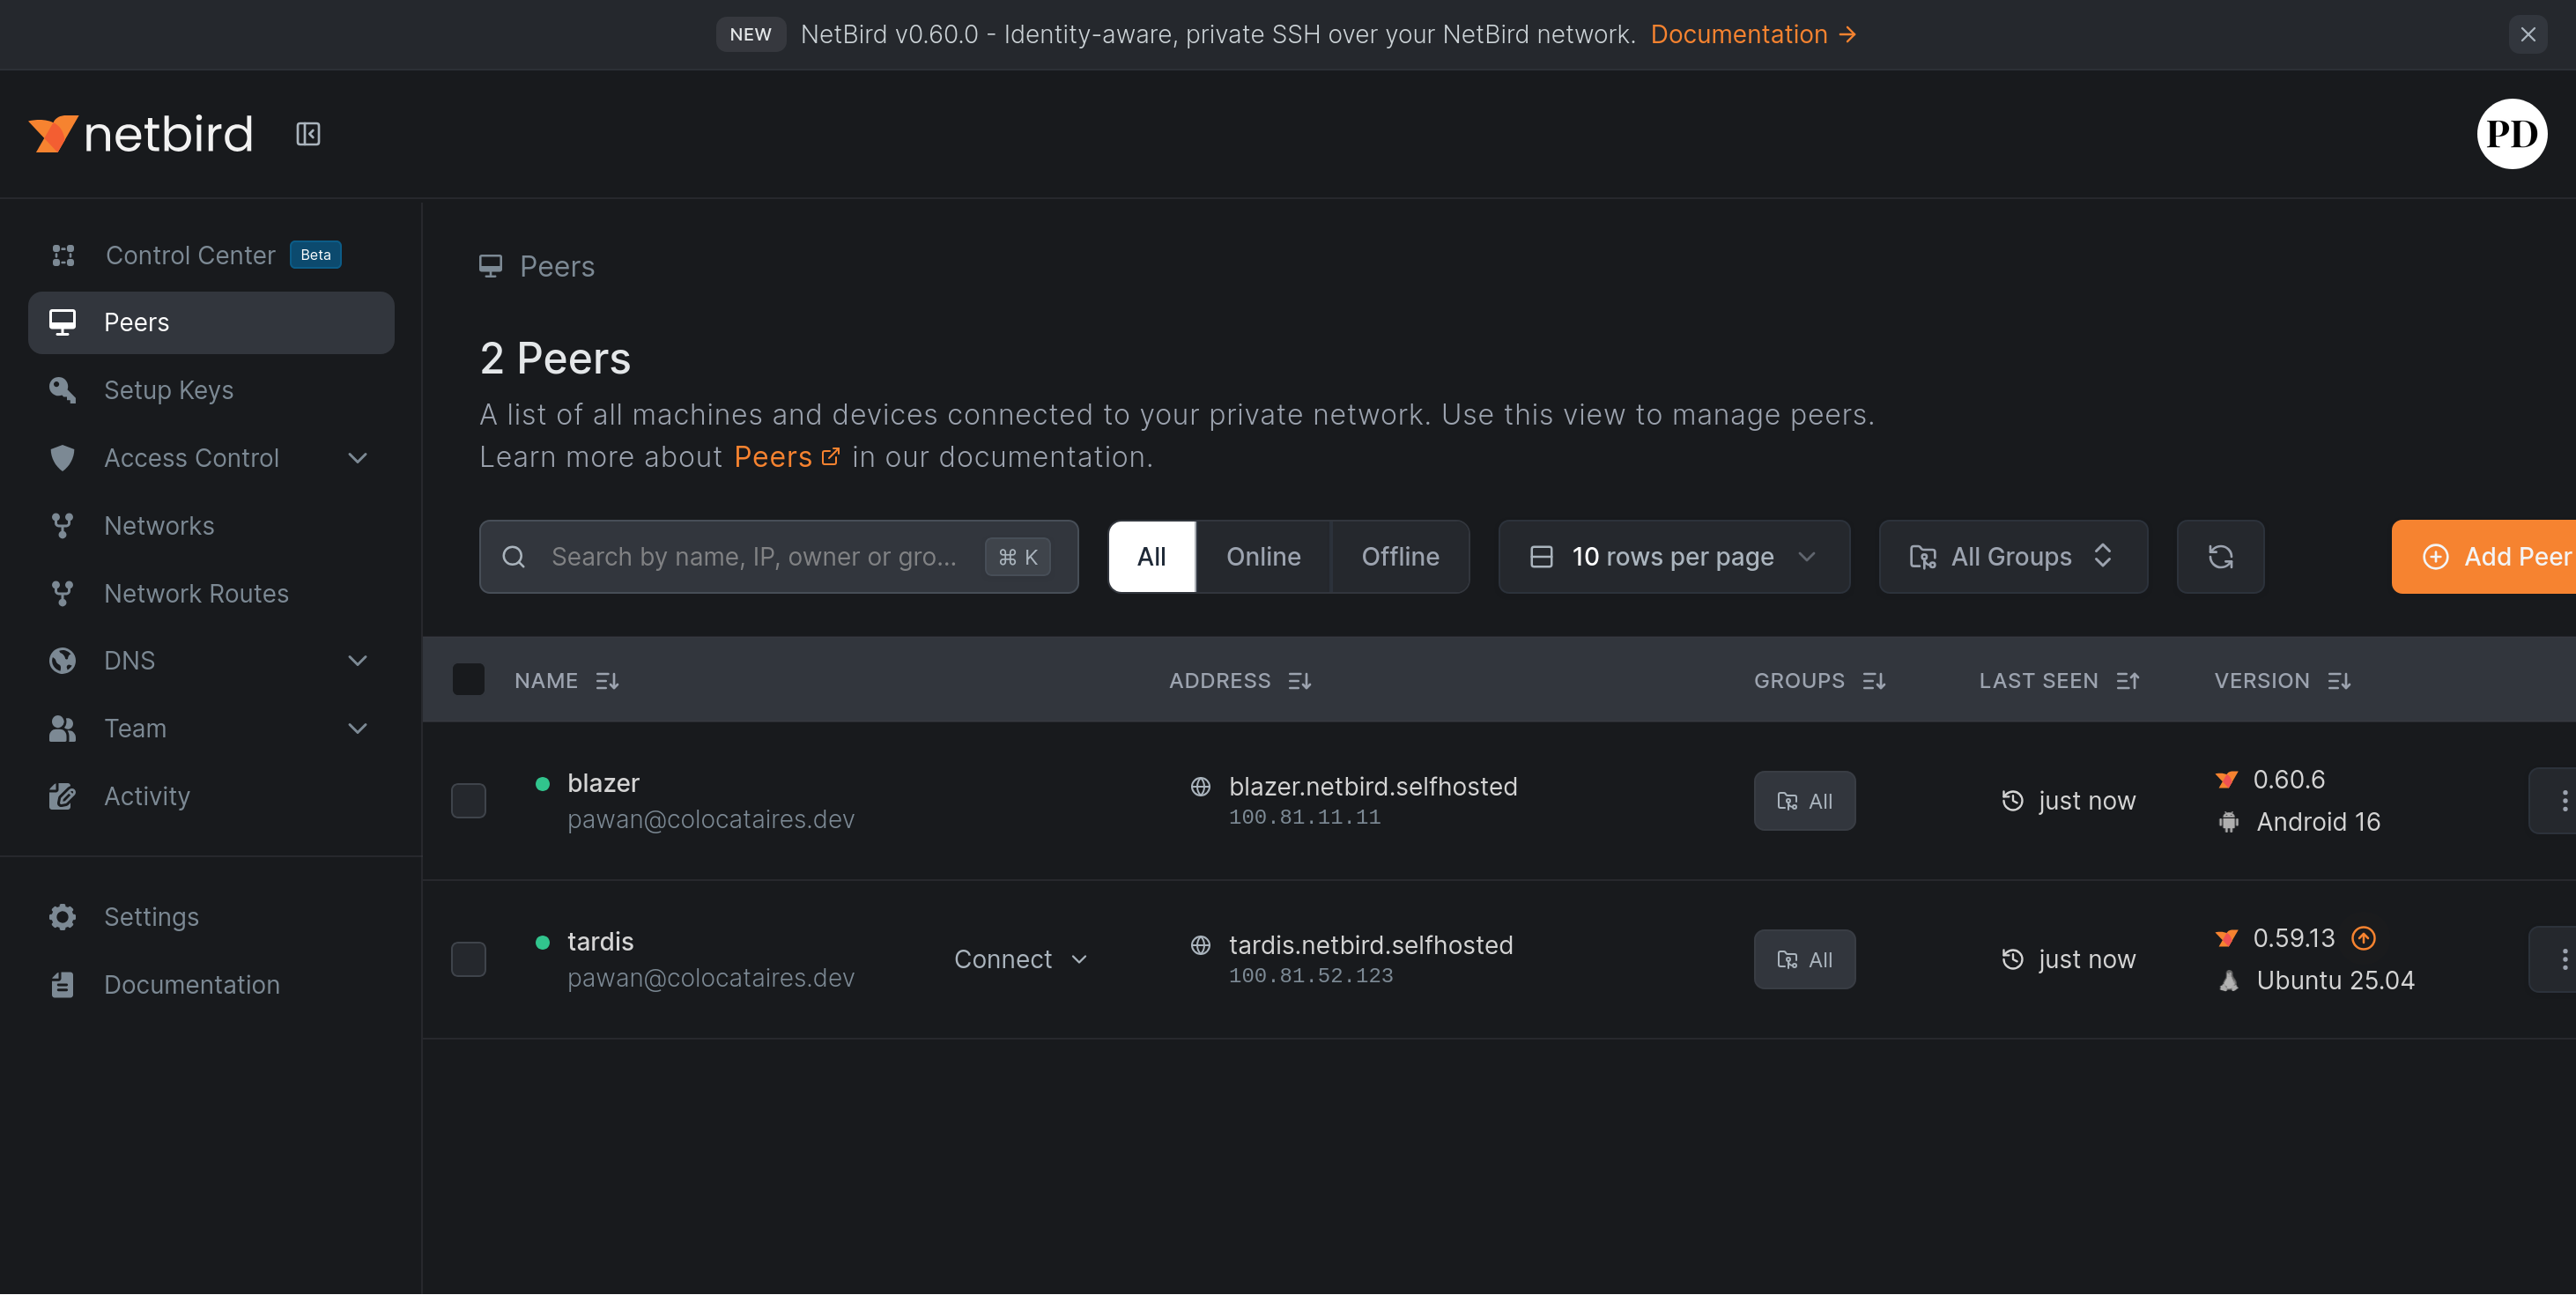
And here we notice some details - that each of our peers has been given a nice domain name in addition to the IP address assigned to it on the network.
--dns-domain=netbird.selfhosted option in the generated docker-compose.ymlClicking on a peer name will bring up the details.
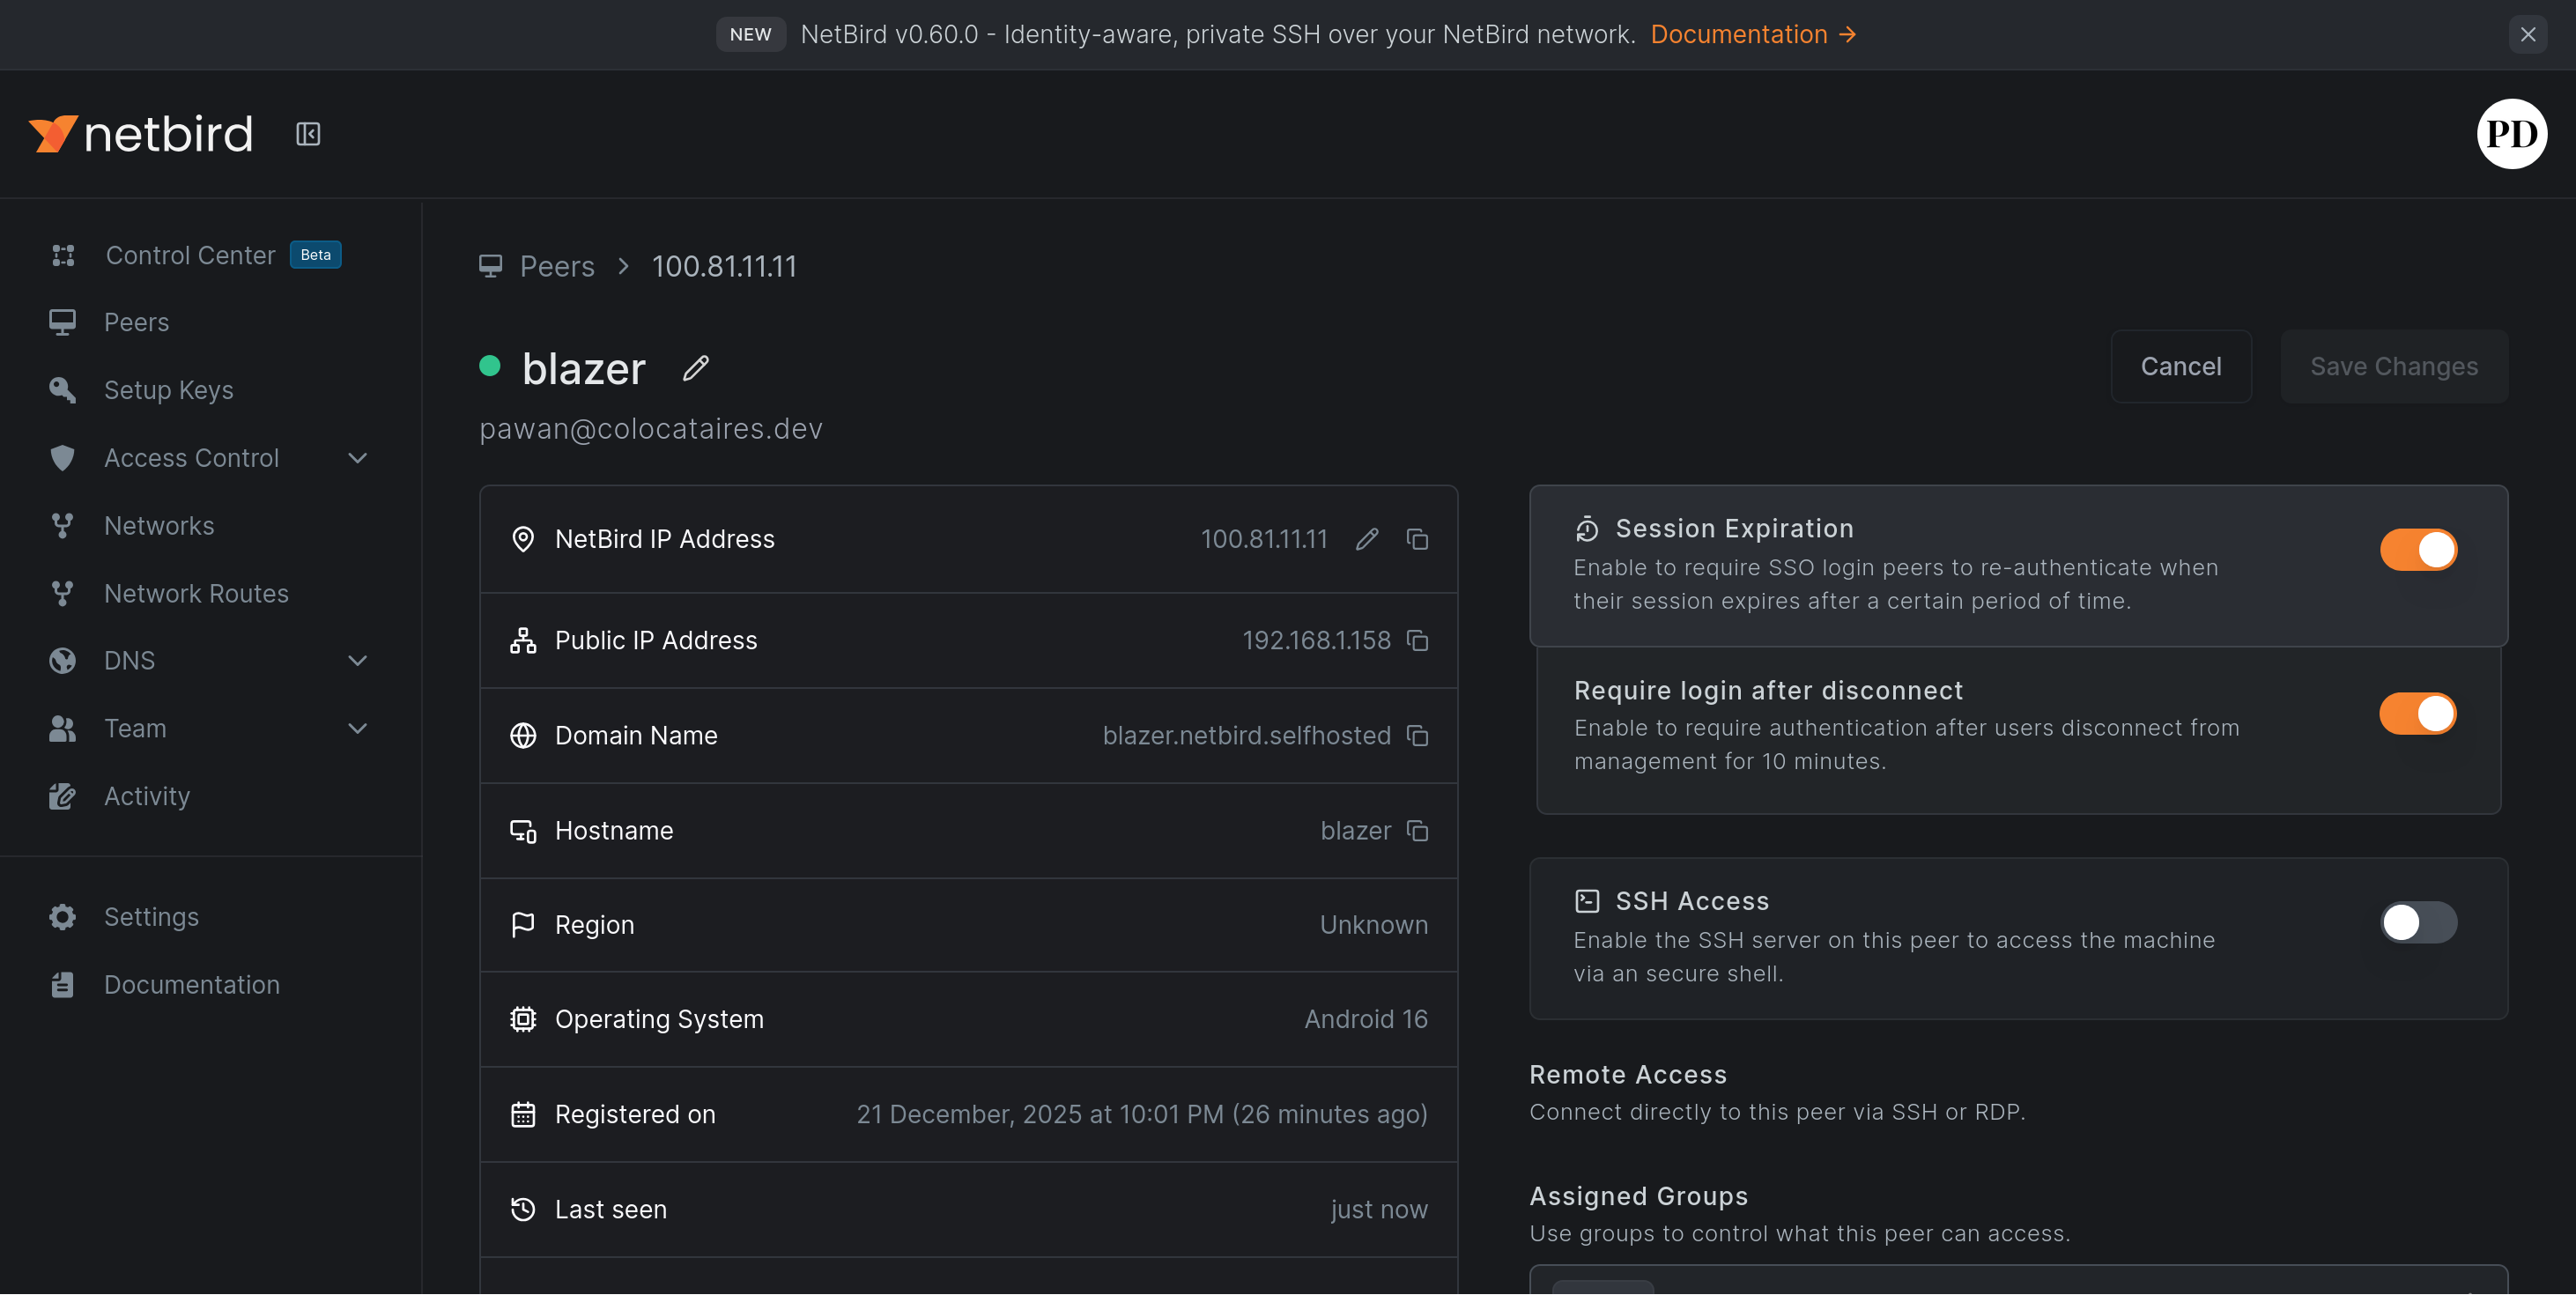
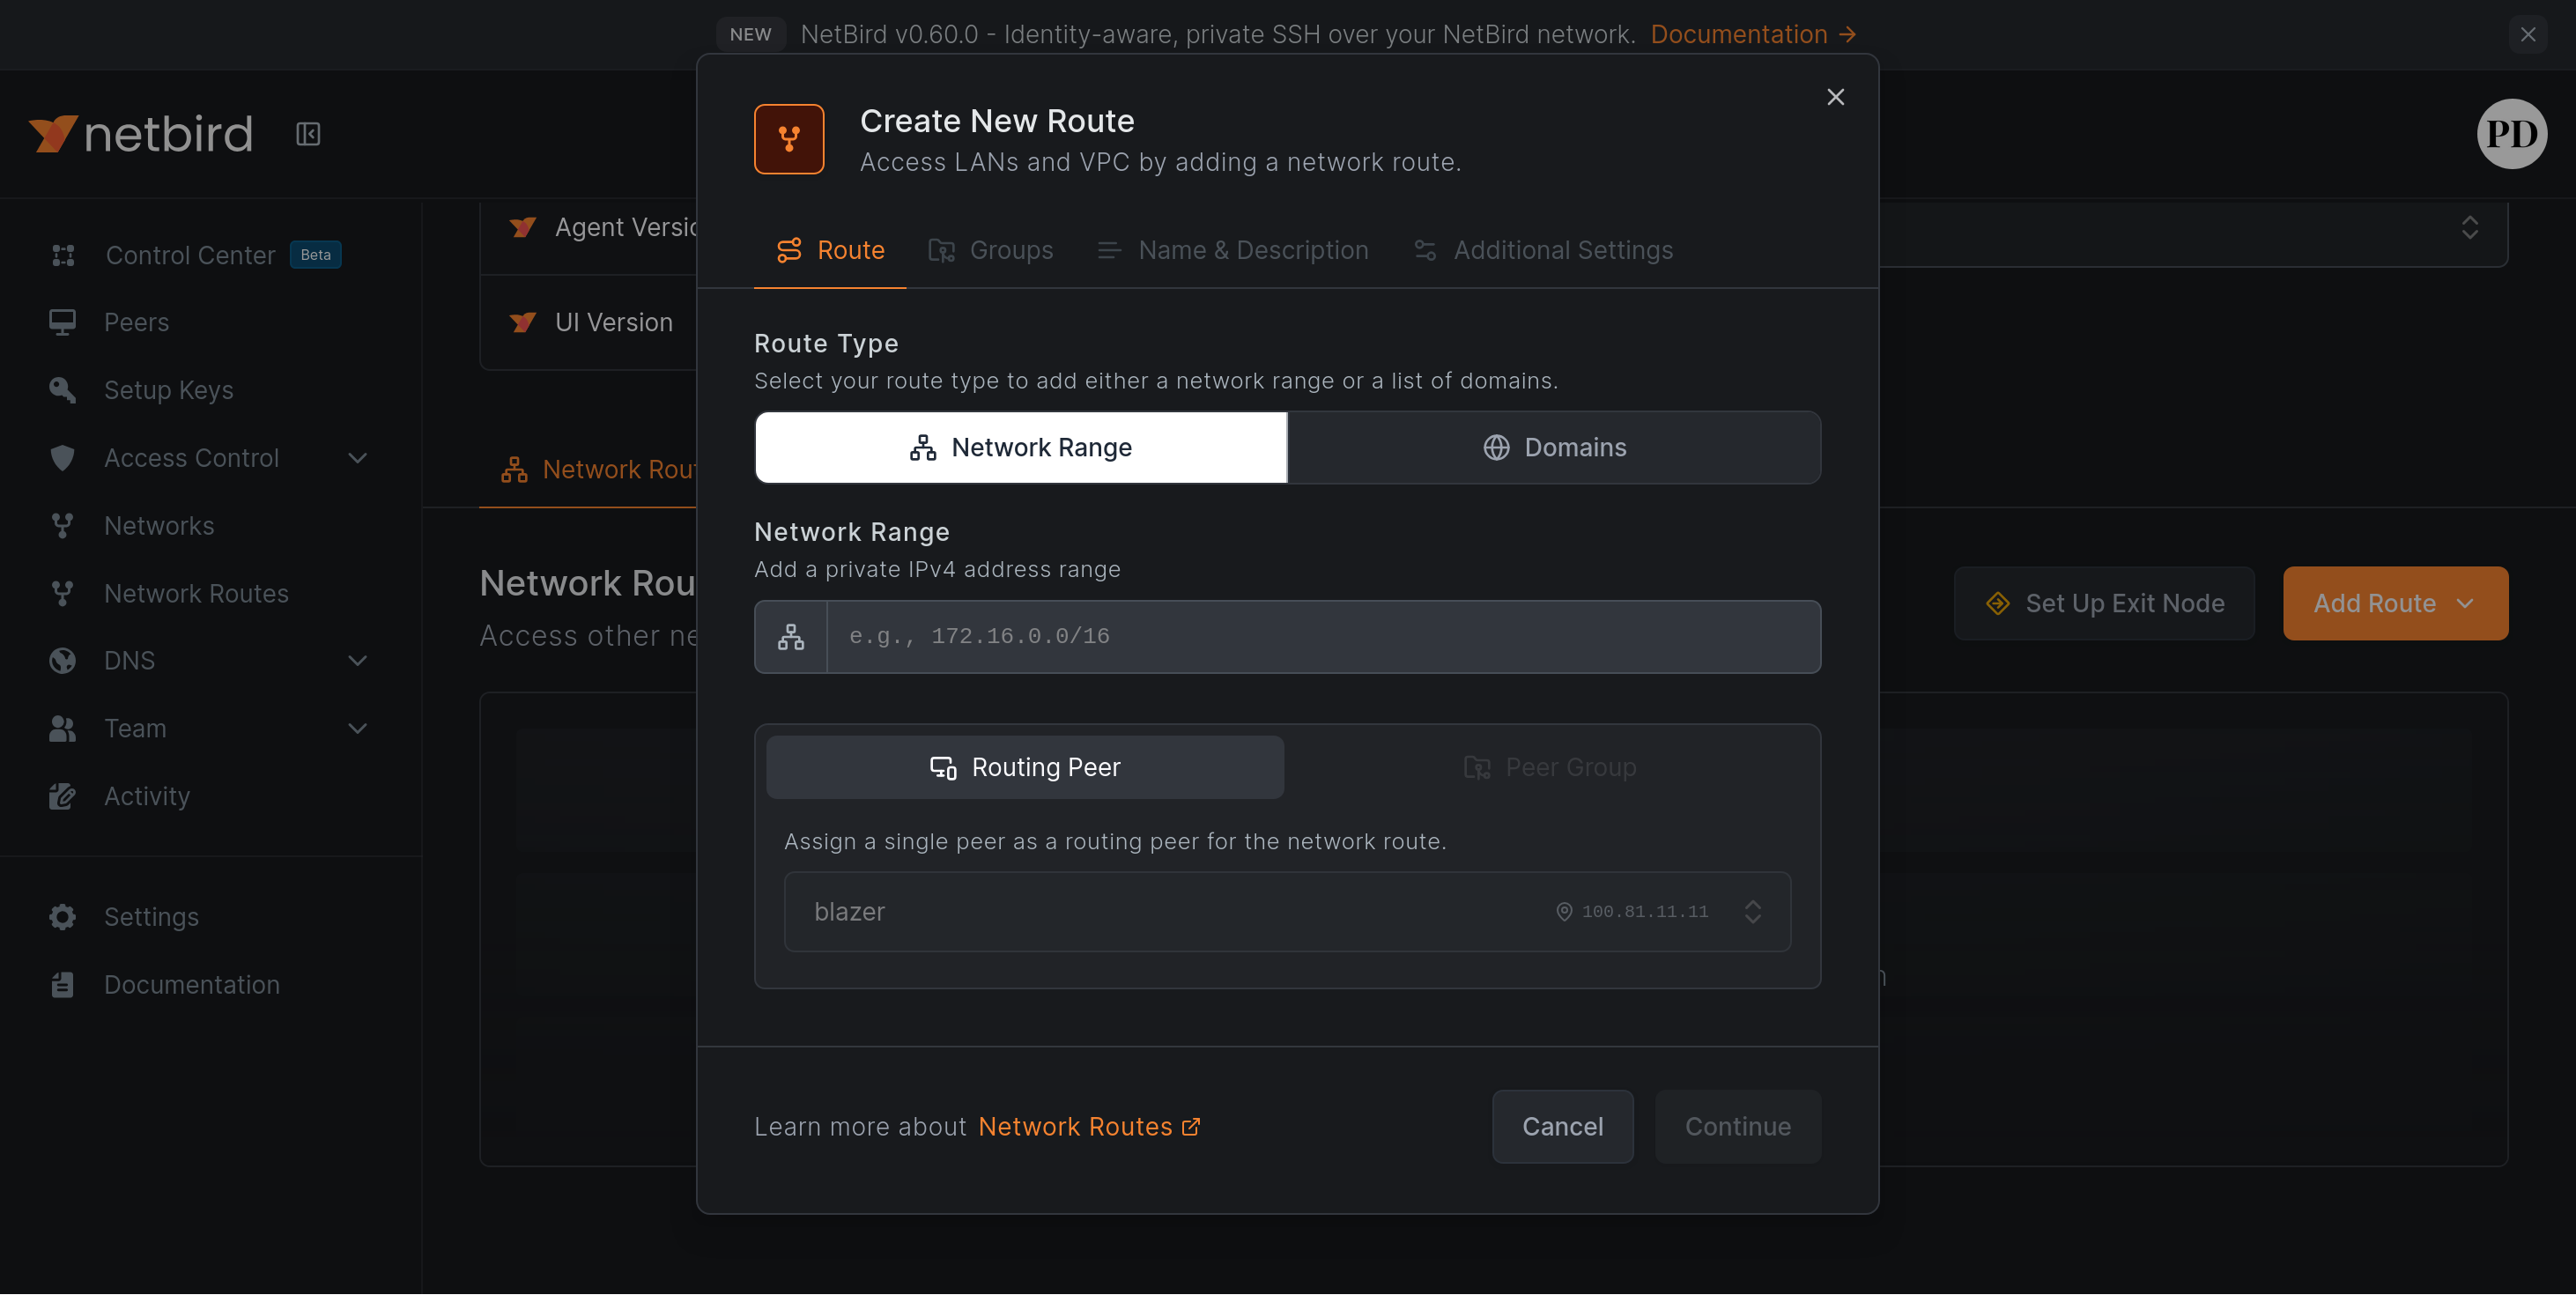
Here you can do fun things like enable SSH access, set up exit nodes and add more routes to the peer, making it the gateway to your internal network if you please.
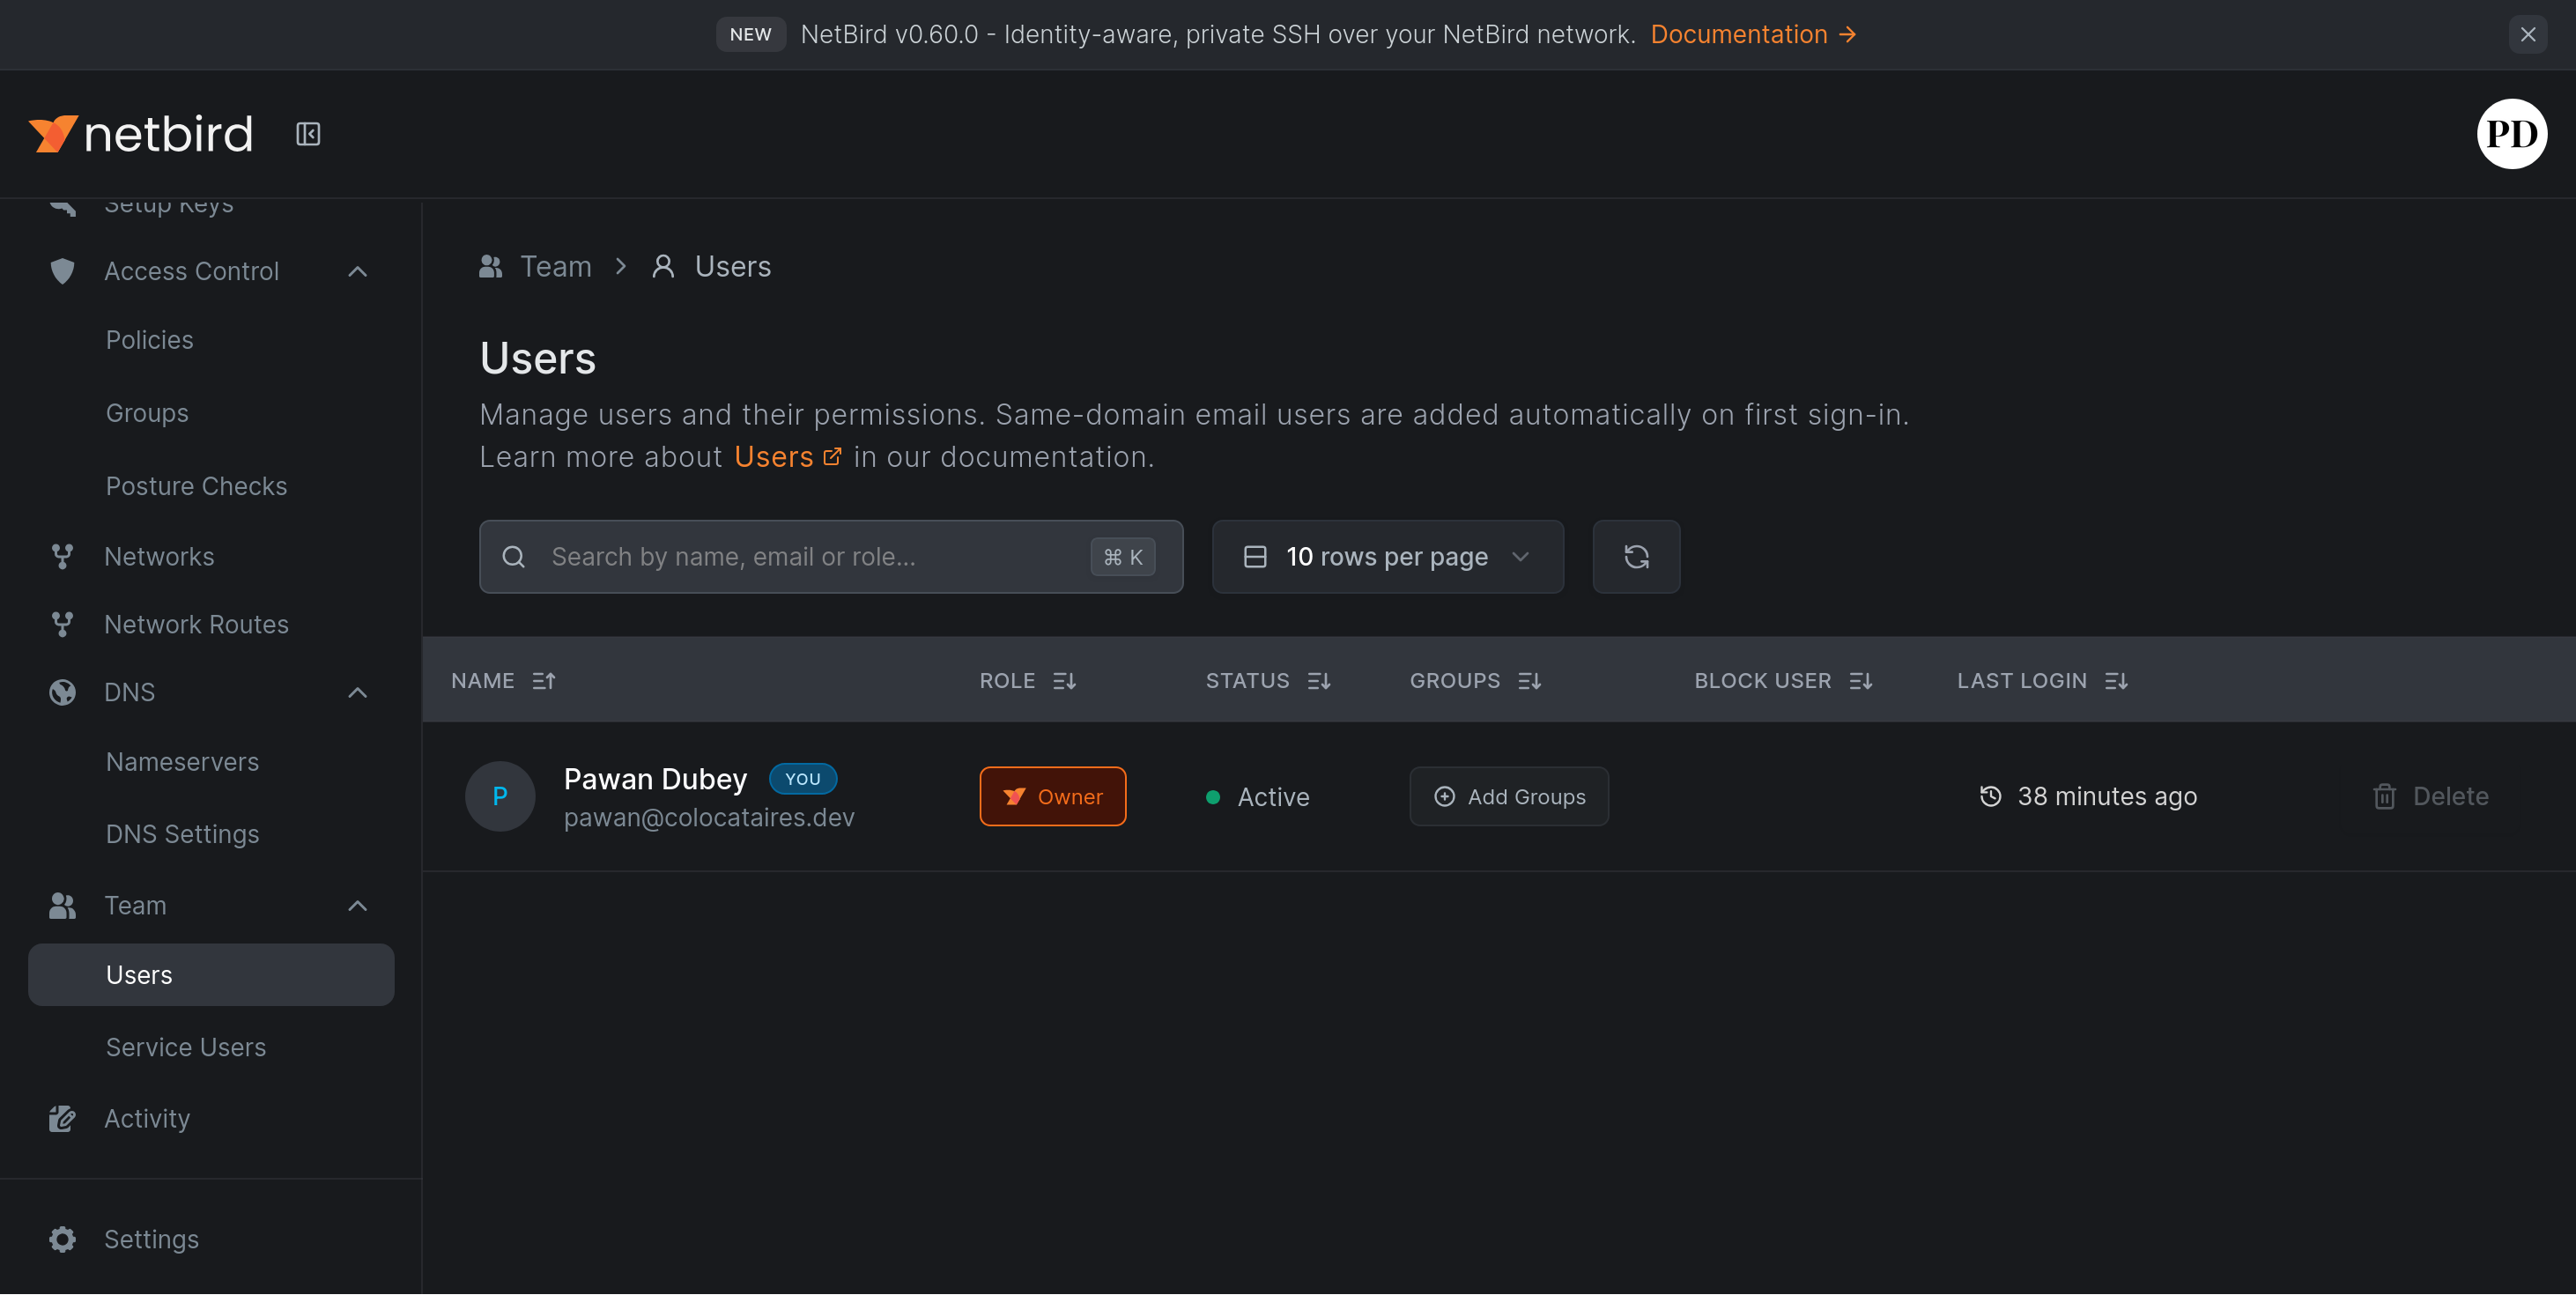
Of course you can also add more users if you want to share access with your trusted contacts.
Validation
This is all well and good, but what have we unlocked exactly?
Well, it is difficult to demonstrate this with just two devices all on the local network like we have here, but if we pretend that:
- The devices are on separate networks
- The control plane is hosted on a third network that’s accessible to all peers (e.g. the public internet)
Then we can try and see if we can ping the two hosts! From tardis
ping blazer.netbird.selfhosted
And we should see pings succeed! (which also means the DNS resolution works)
PING blazer.netbird.selfhosted (100.81.11.11) 56(84) bytes of data.
64 bytes from blazer.netbird.selfhosted (100.81.11.11): icmp_seq=1 ttl=64 time=458 ms
64 bytes from blazer.netbird.selfhosted (100.81.11.11): icmp_seq=2 ttl=64 time=627 ms
64 bytes from blazer.netbird.selfhosted (100.81.11.11): icmp_seq=3 ttl=64 time=551 ms
64 bytes from blazer.netbird.selfhosted (100.81.11.11): icmp_seq=4 ttl=64 time=469 ms
^C
--- blazer.netbird.selfhosted ping statistics ---
4 packets transmitted, 4 received, 0% packet loss, time 3003ms
rtt min/avg/max/mdev = 457.920/526.115/626.870/68.335 ms
And from the other direction (from Termux):
PING tardis.netbird.selfhosted (100.81.52.123) 56(84) bytes of data.
64 bytes from tardis.netbird.selfhosted (100.81.52.123): icmp_seq=1 ttl=64 time=278 ms
64 bytes from tardis.netbird.selfhosted (100.81.52.123): icmp_seq=2 ttl=64 time=197 ms
64 bytes from tardis.netbird.selfhosted (100.81.52.123): icmp_seq=3 ttl=64 time=424 ms
64 bytes from tardis.netbird.selfhosted (100.81.52.123): icmp_seq=4 ttl=64 time=42.0 ms
^C
--- tardis.netbird.selfhosted ping statistics ---
4 packets transmitted, 4 received, 0% packet loss, time 3005ms
rtt min/avg/max/mdev = 42.070/235.608/424.712/138.302 ms
Conclusion
Wow, that was quite a bit more arduous than I expected. There were many hiccups:
- Using PocketID instead of the default IdP (Zitadel) adds complexity
- The multi-layer configuration can make for some frustrating debugging
- There are many components to run, even with a “simple” single-tenant setup, meaning more pieces that can potentially break
But, let’s not lose sight of the good:
- All of this is free and open source, including first-party clients for all major platforms
- The dashboard and UI is very polished
- It includes “fancy” features like custom routes, magic DNS, and complicated access control fully managed with a UI
- It all works!
So should you self-host Netbird? I think this is totally viable given your comfort with the complexity of the service. If you use it for its purpose it will become quite a critical piece of your system because it will sit in front of everything else, so uptime for it matters as much as your internal network itself.
If you are comfortable with that, self-hosting Netbird seems perfectly viable and even a good idea. Given the first-party nature of the pieces, the Netbird situation is better than running Tailscale + Headscale.
However, if you are not comfortable with having to manage your own VPN, it is better to use the hosted service from Netbird (or Tailscale). Netbird has a more generous free tier (almost equivalent to Tailscale’s $5/month tier). Tailscale has availability on more devices (like AppleTV) and has more “niceties” built-in (like funnel/serve) but those niceties are not hard to reproduce with a reverse proxy (which you are already running with Caddy!). As far as I can tell neither service stores private keys of the peers in their control plane, and both offer some form of device approval process to protect against unwanted access, making it all relatively low risk (but not no-risk).
Apart from the comparisons, I am quite impressed with Netbird. Hope you found this exploration useful! Their documentation is quite good if you want to explore further.
Thanks for reading this far, and follow along for future posts in #Self-hostember . You can now follow us on Mastodon to keep up to date with us as well!