Self-Hostember #11: Actual - Open Source Budgeting
Table of Contents
ℹ️ This post is part of a series , and it assumes that you’ve followed the instructions from Day Zero first.
Introduction
I have a confession to make: my finances are not complicated enough to need a budgeting app. However, most people have more complicated financial lives, with multiple income sources, long term liabilities, diversified investments etc. that makes it difficult to get a “full picture” of the financial state or make projections in the future with confidence without some external aid.
Budgeting apps have been some of the first pieces of software ever developed (Quicken is the earliest notable personal budgeting application I can find, released in 1983 and still offered as a product!) because the total addressable market is probably the entire adult population.
Actual is a relatively recent entry in that long lineage. However, it is self-hostable and entirely local. While it has a server , it can be run without one, entirely in the browser if you prefer to sacrifice sync in favour of simplicity of install. It supports importing from various different transaction formats, and has a big community of user-developed extensions around it that can do things like connect it to your Home Assistant installation (why do that? - I am not sure).
Actual implements the envelope budgeting method , in which you predefine categories of expenses with set limits, and stop spending in those categories after you’ve hit those limits. This is a nice and easy way to get started with budgeting for most people. If you’ve tried envelope budgeting and found it to be a poor fit for your needs then Actual may not be the tool for you.
Sidenote: Until very recently, getting your data from your financial institutions and into your budgeting application was an exercise in frustration. To be honest, it still is, but there are some efforts to make it less painful like simpleFIN but they all still mostly depend on third-party platforms. For this reason, I would recommend doing a manual import of CSV/QFX etc (Actual recommends QFX but supports many options ).
Let’s try and install it.
Install Actual via Docker
Actual has many different ways to install the application
depending on your requirements, but we will take the docker-compose.yml path like we are wont to do in this series
. We are also going to install the server since the post will not make for very interesting reading without it.
Let’s create our install directory first.
mkdir -p actual/data
cd actual
And let’s borrow the official docker-compose
We have made some minor modifications:
- Changed the port mapping to map to localhost only (see our post about security )
- Specified the local
datadirectory to be mapped to the container - Removed environment variables
Actual provides many different configuration options, which are detailed here
cat > docker-compose.yml <<EOF
services:
  actual_server:
    image: docker.io/actualbudget/actual-server:latest
    ports:
      - 127.0.0.1:5006:5006
    volumes:
      - ./data:/data
    healthcheck:
      # Enable health check for the instance
      test: ['CMD-SHELL', 'node src/scripts/health-check.js']
      interval: 60s
      timeout: 10s
      retries: 3
      start_period: 20s
    restart: unless-stopped
EOF
And let’s start the server:
docker compose up -d
It will take a minute to pull everything and start, but we should see it start successfully:
docker compose ps
NAME                     IMAGE                                         COMMAND                  SERVICE         CREATED          STATUS                    PORTS
actual-actual_server-1   docker.io/actualbudget/actual-server:latest   "/usr/bin/tini -g --…"   actual_server   21 seconds ago   Up 20 seconds (healthy)   127.0.0.1:5006->5006/tcp
Before we forget, let’s add an entry in caddy for nicer URLs.
@actual host domain.tld
handle @actual {
        reverse_proxy 127.0.0.1:5006
}
And after sudo systemctl restart caddy, we should be able to visit the domain you configured in the browser!
Setup and use
Navigating to the configured domain in the browser will bring you to the the setup page where you will assign a password.
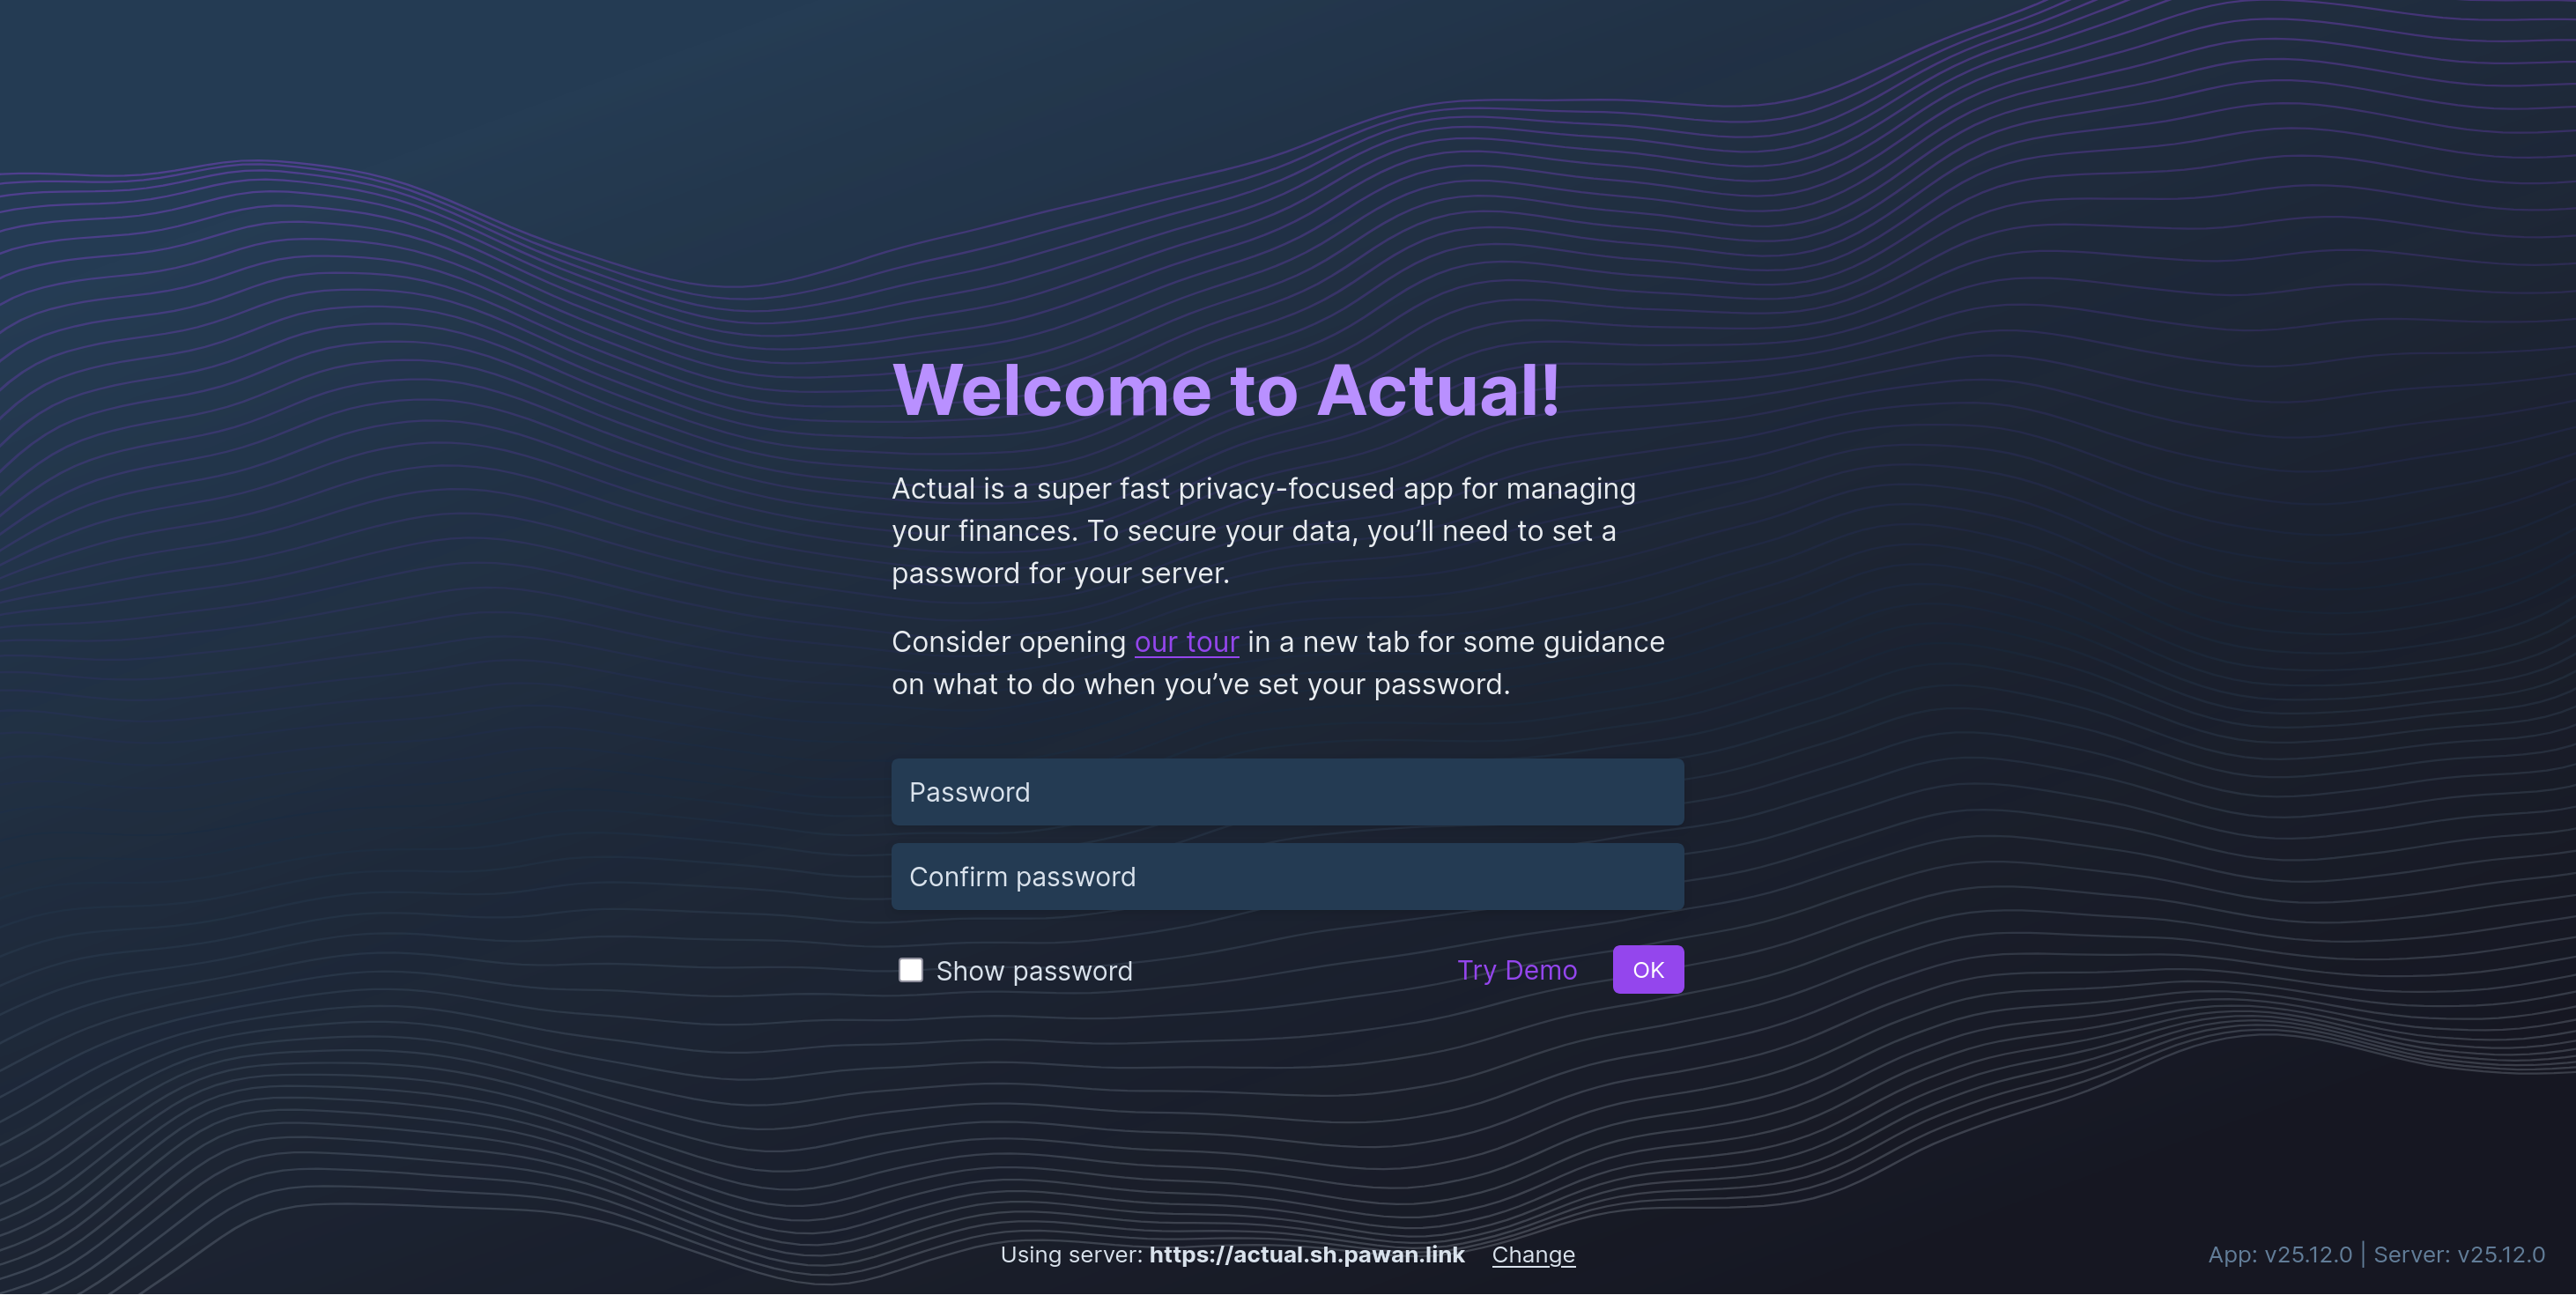
Actual will then ask you to sign-in using that password.
After signing-in, you will have the option to either:
- Start fresh and enter all data manually
- Start with demo data
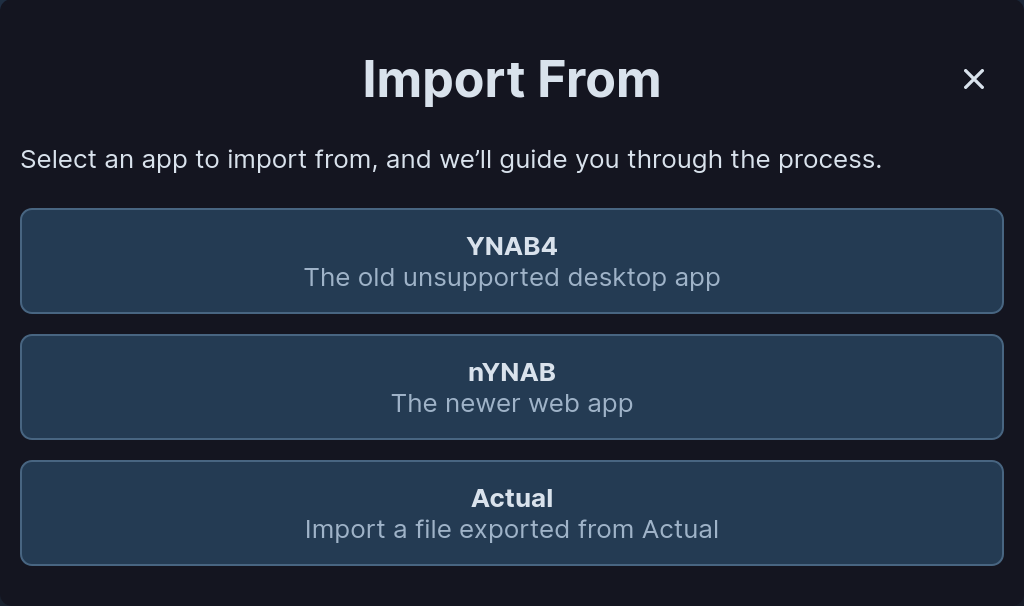
- Import your existing data from your YNAB app, or another Actual instance.
Since I don’t have an existing budget data export and don’t want to publicise my actual finances, we will just choose the demo option here.
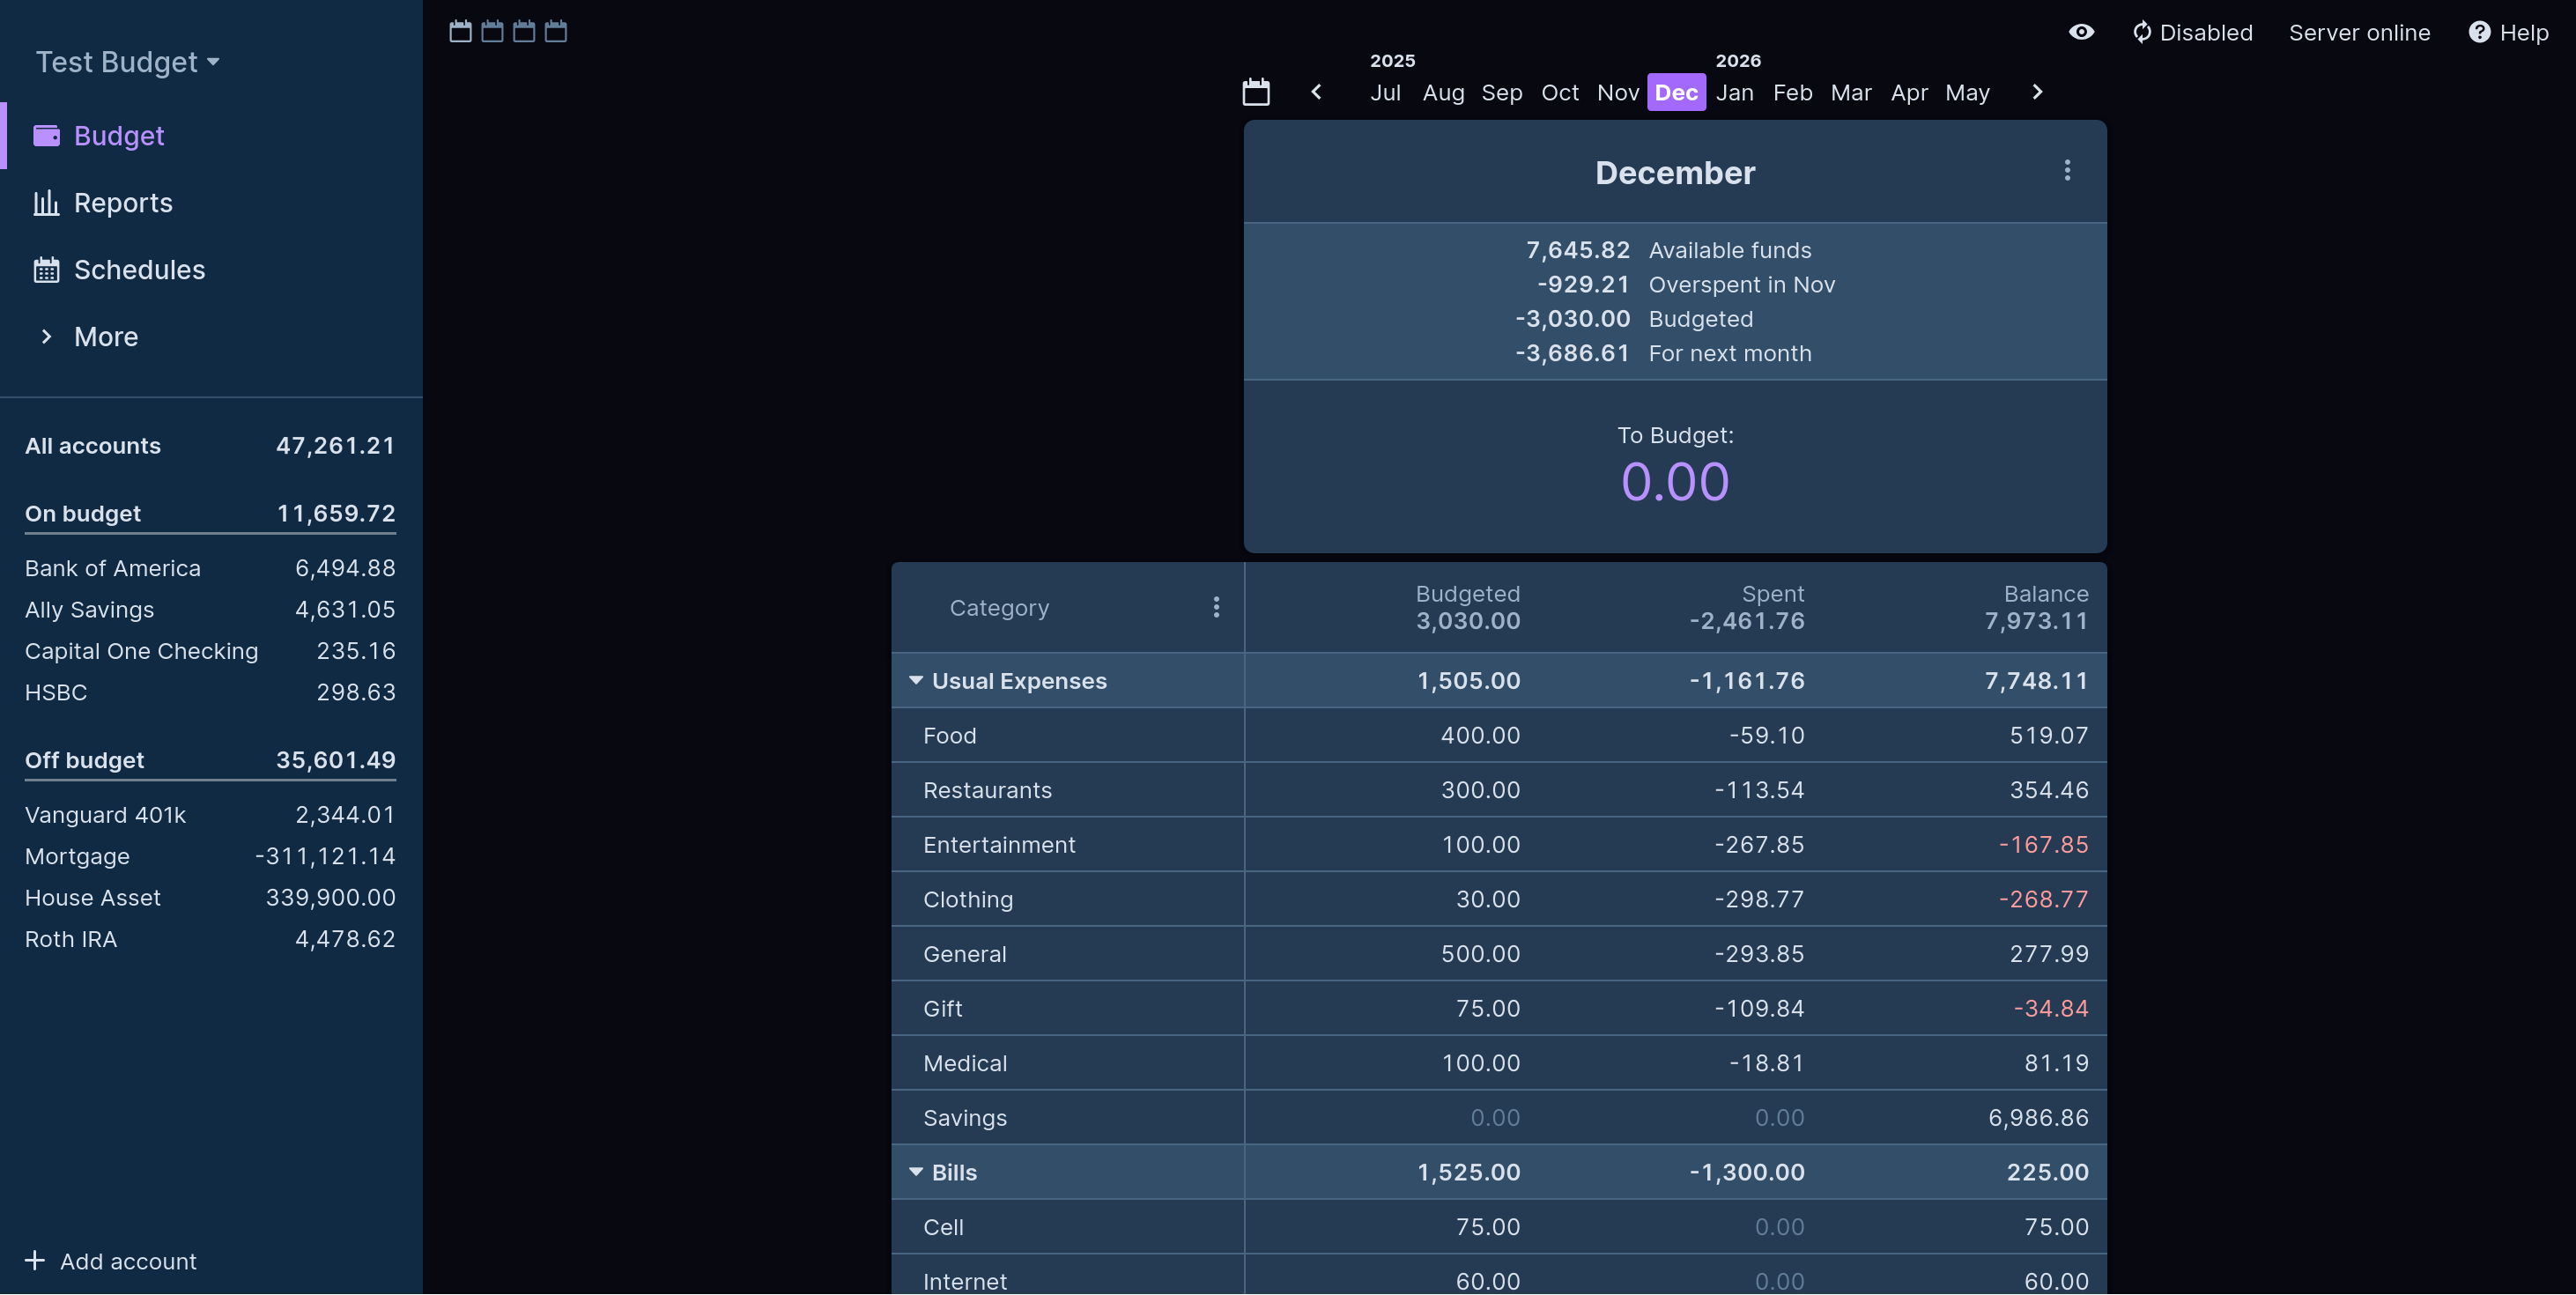
Once Actual finishes loading the demo data, you are dropped into a pretty dense view of the data right away. No pretty charts or summary cards - just pure tabulated data.
In fact, you can make this view even more dense by clicking on the “calendar” icons on the top left of the view to show more months at once.

You can see that the demo data has some typical categories for both expenses and income. It also seems like there is a separate section for recurring bills, which is nice, especially if they don’t have to be manually budgeted every time. The current month has all money budgeted to some category, while the following three months have some money left to be budgeted. We can navigate between months by clicking on the chevrons.
I don’t mind this density to be honest, but Actual is not really aiming at newbies with this onboarding experience. I think they built the UI to fit the multi-month view and then scaled it down to a single month for onboarding - which sort of works but looks wonky with all the empty space.
What about the other views? Let’s look at “Reports”:
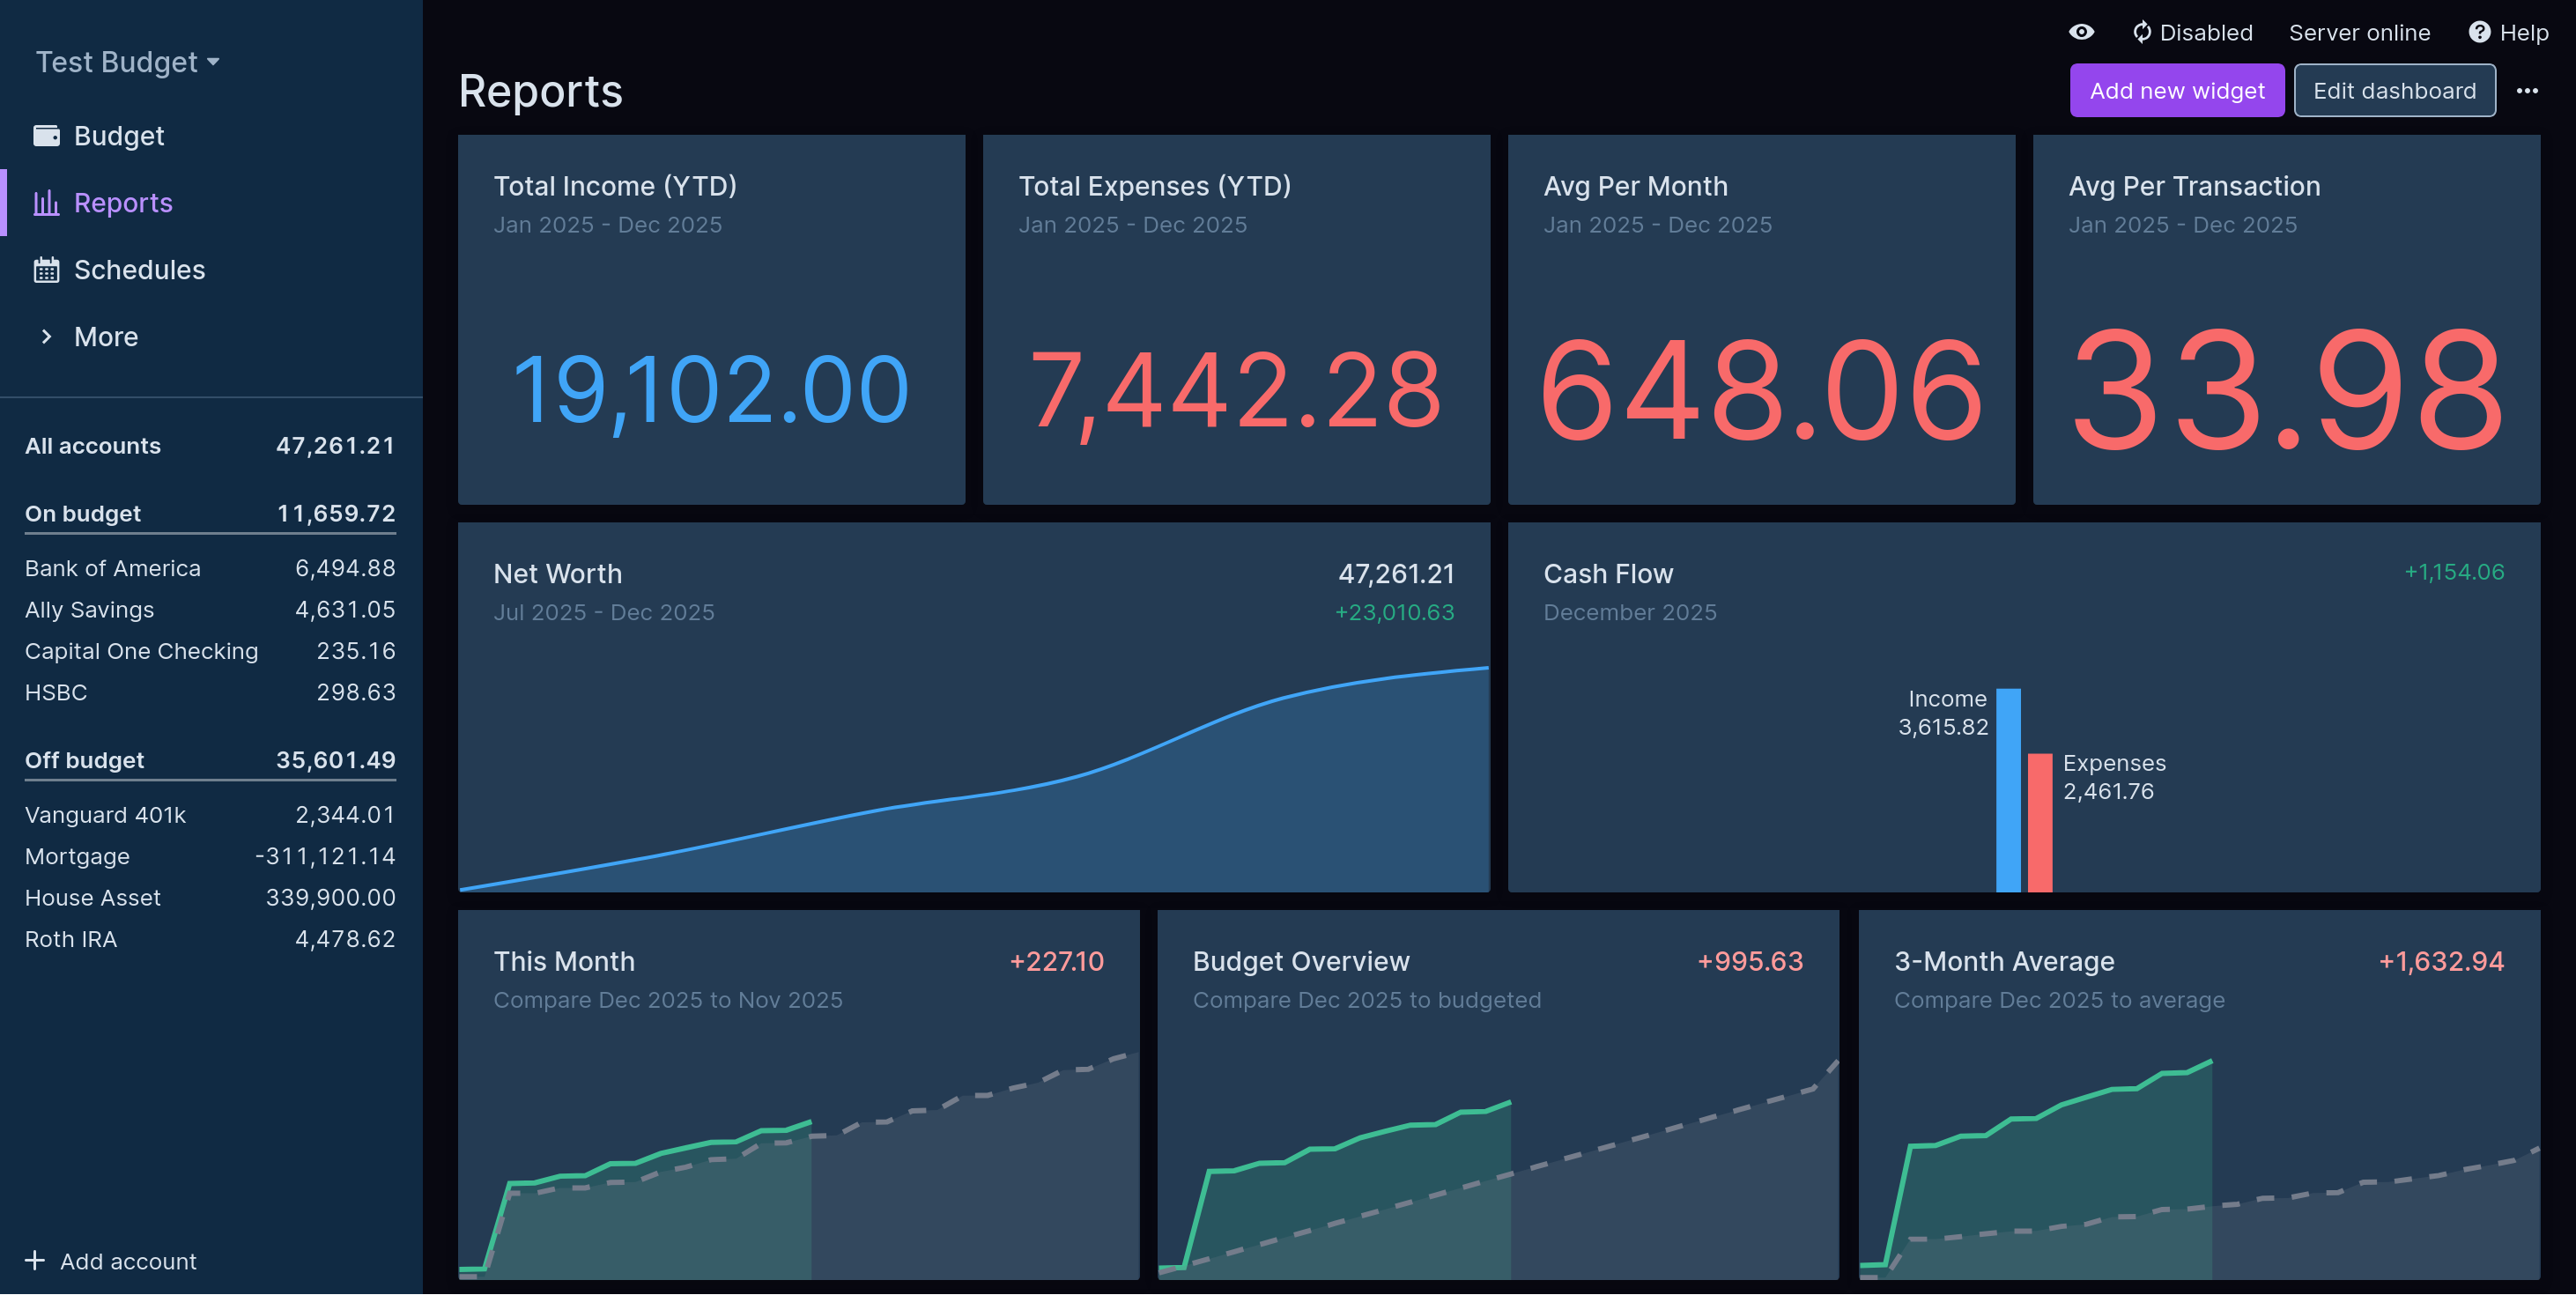
Well, why isn’t this the first screen you are dropped into after importing the demo data? This seems much more digestible and attractive for new users. Also the net worth chart going up is not hurting your chances either, Actual. I jest, but this view is pretty good. It is also possible to drag the widgets around or add new ones. Nifty.
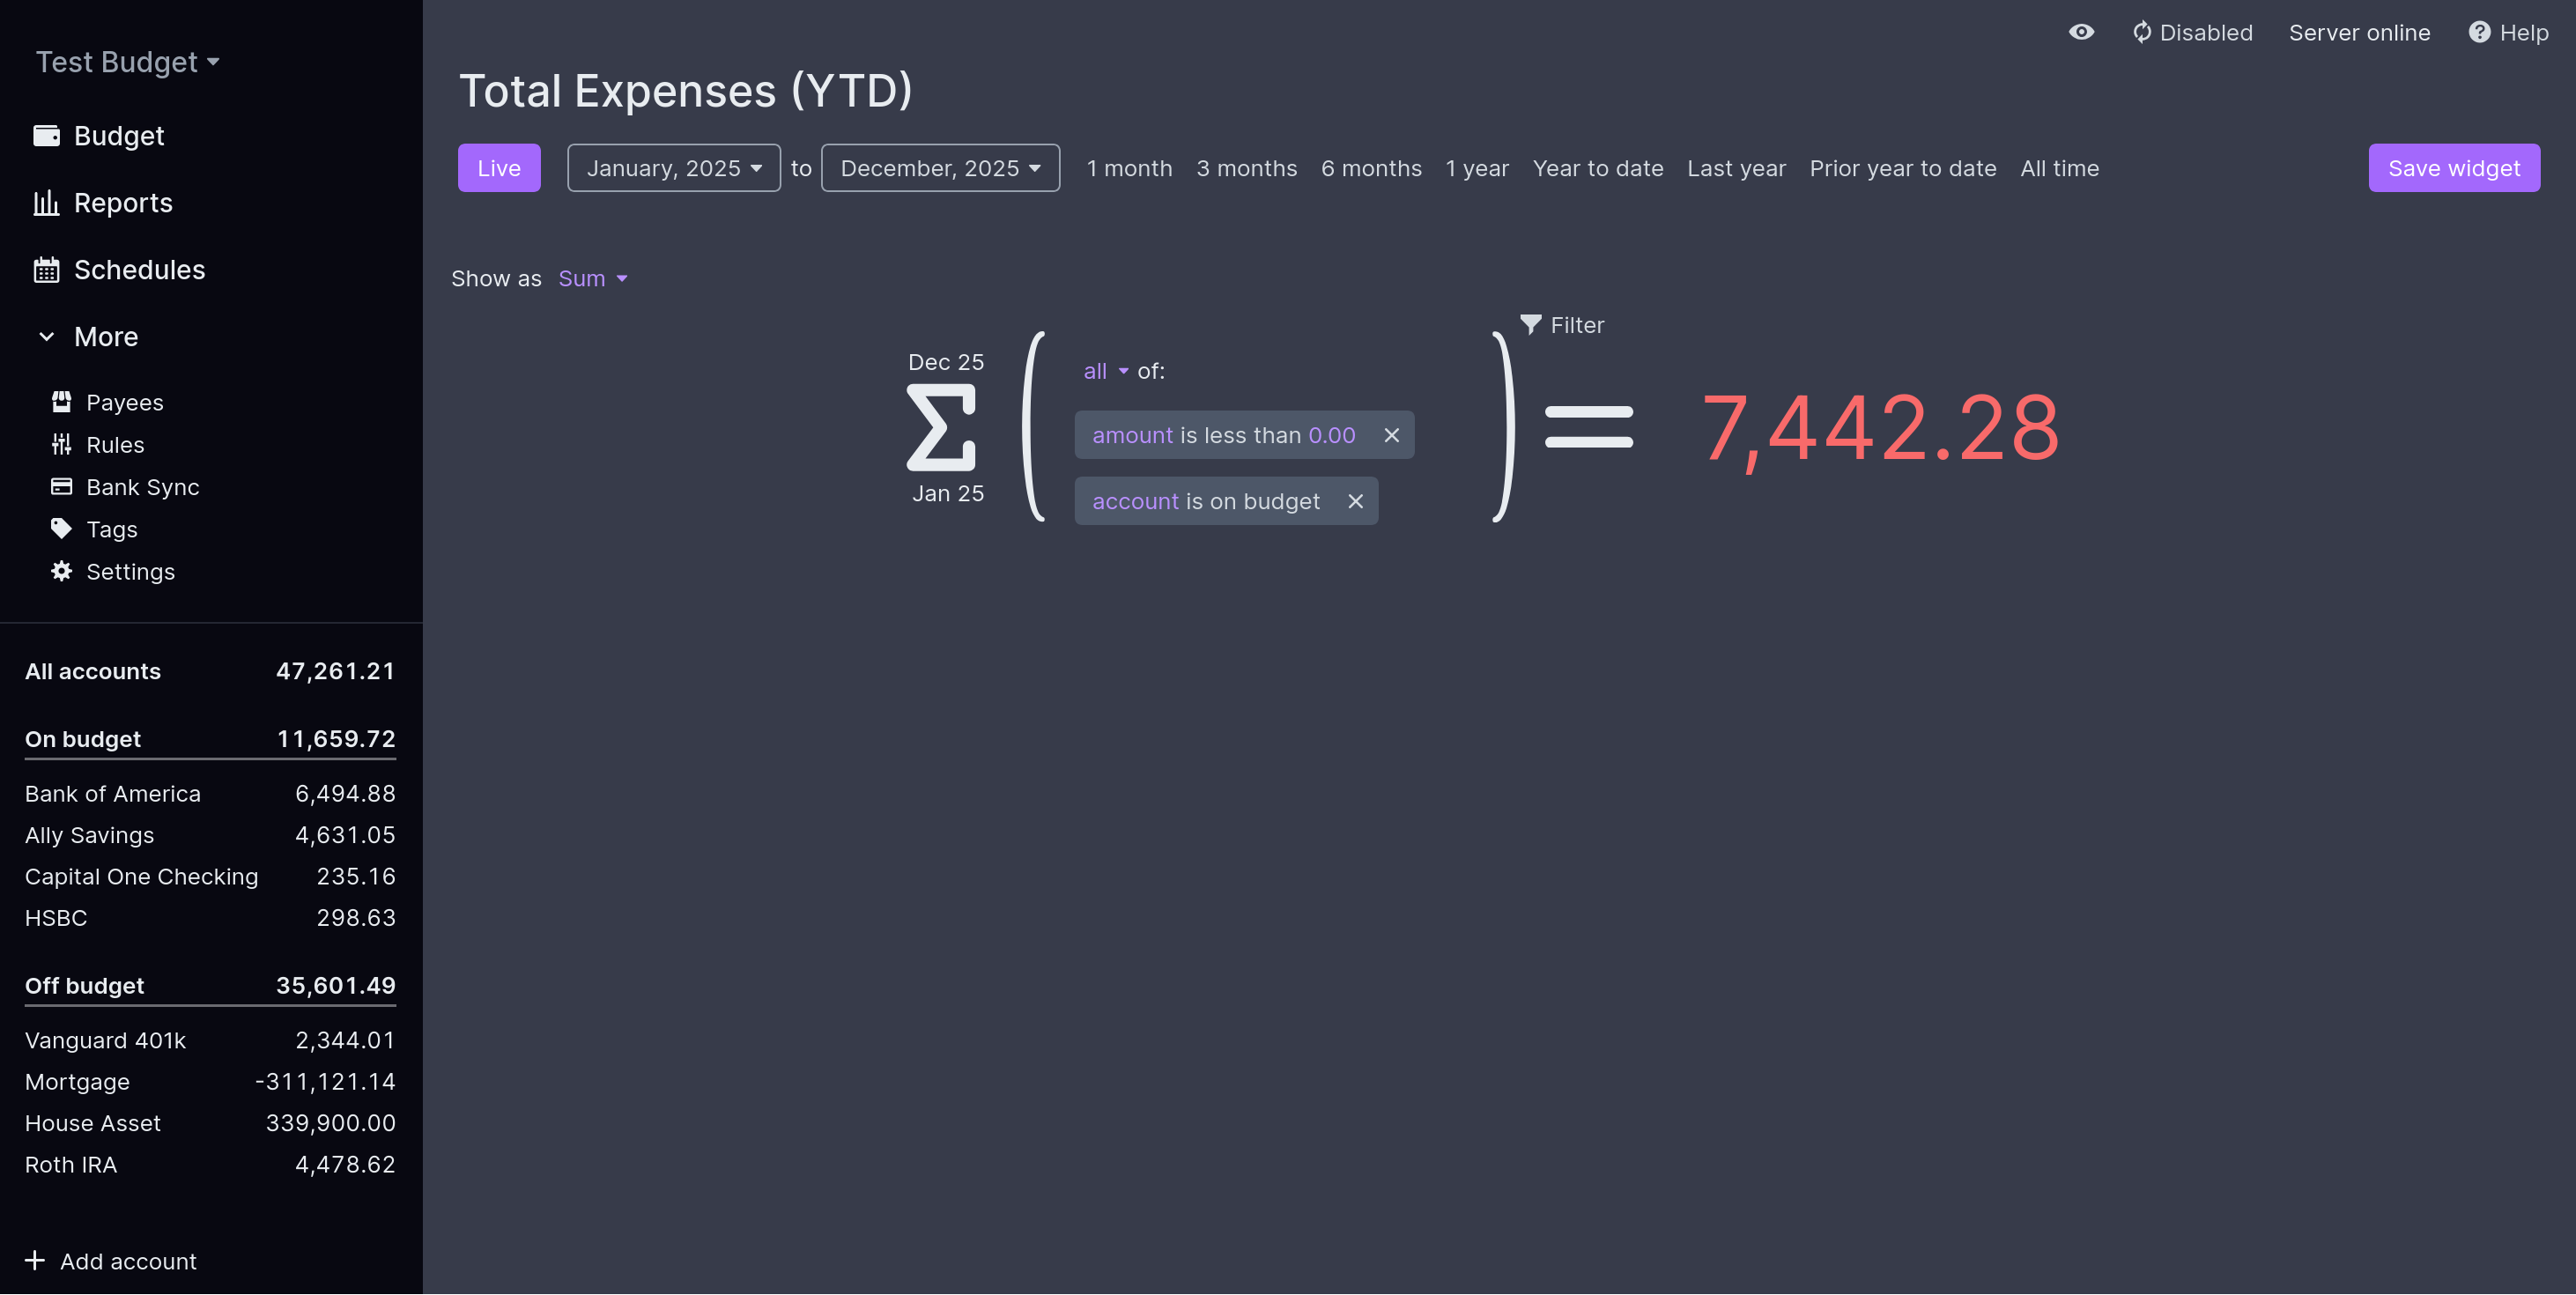
Clicking on the “Total Expenses (YTD)” widget brings you to the editor with really large fonts and mathematical notation. Again, I don’t mind this but this continues to signal “not for newbies”.
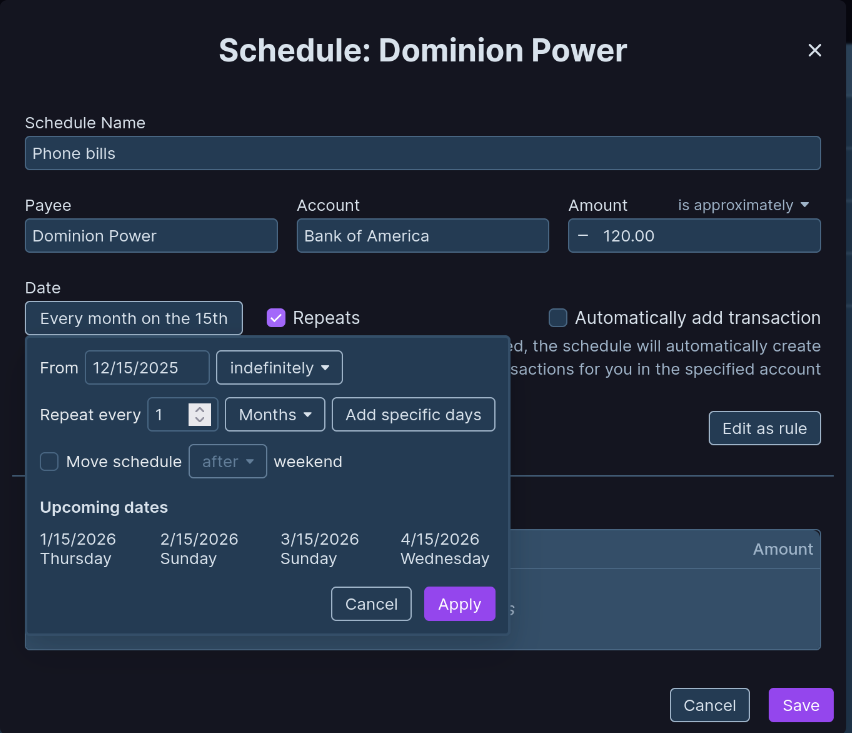
Okay, let’s look at “Schedules”.
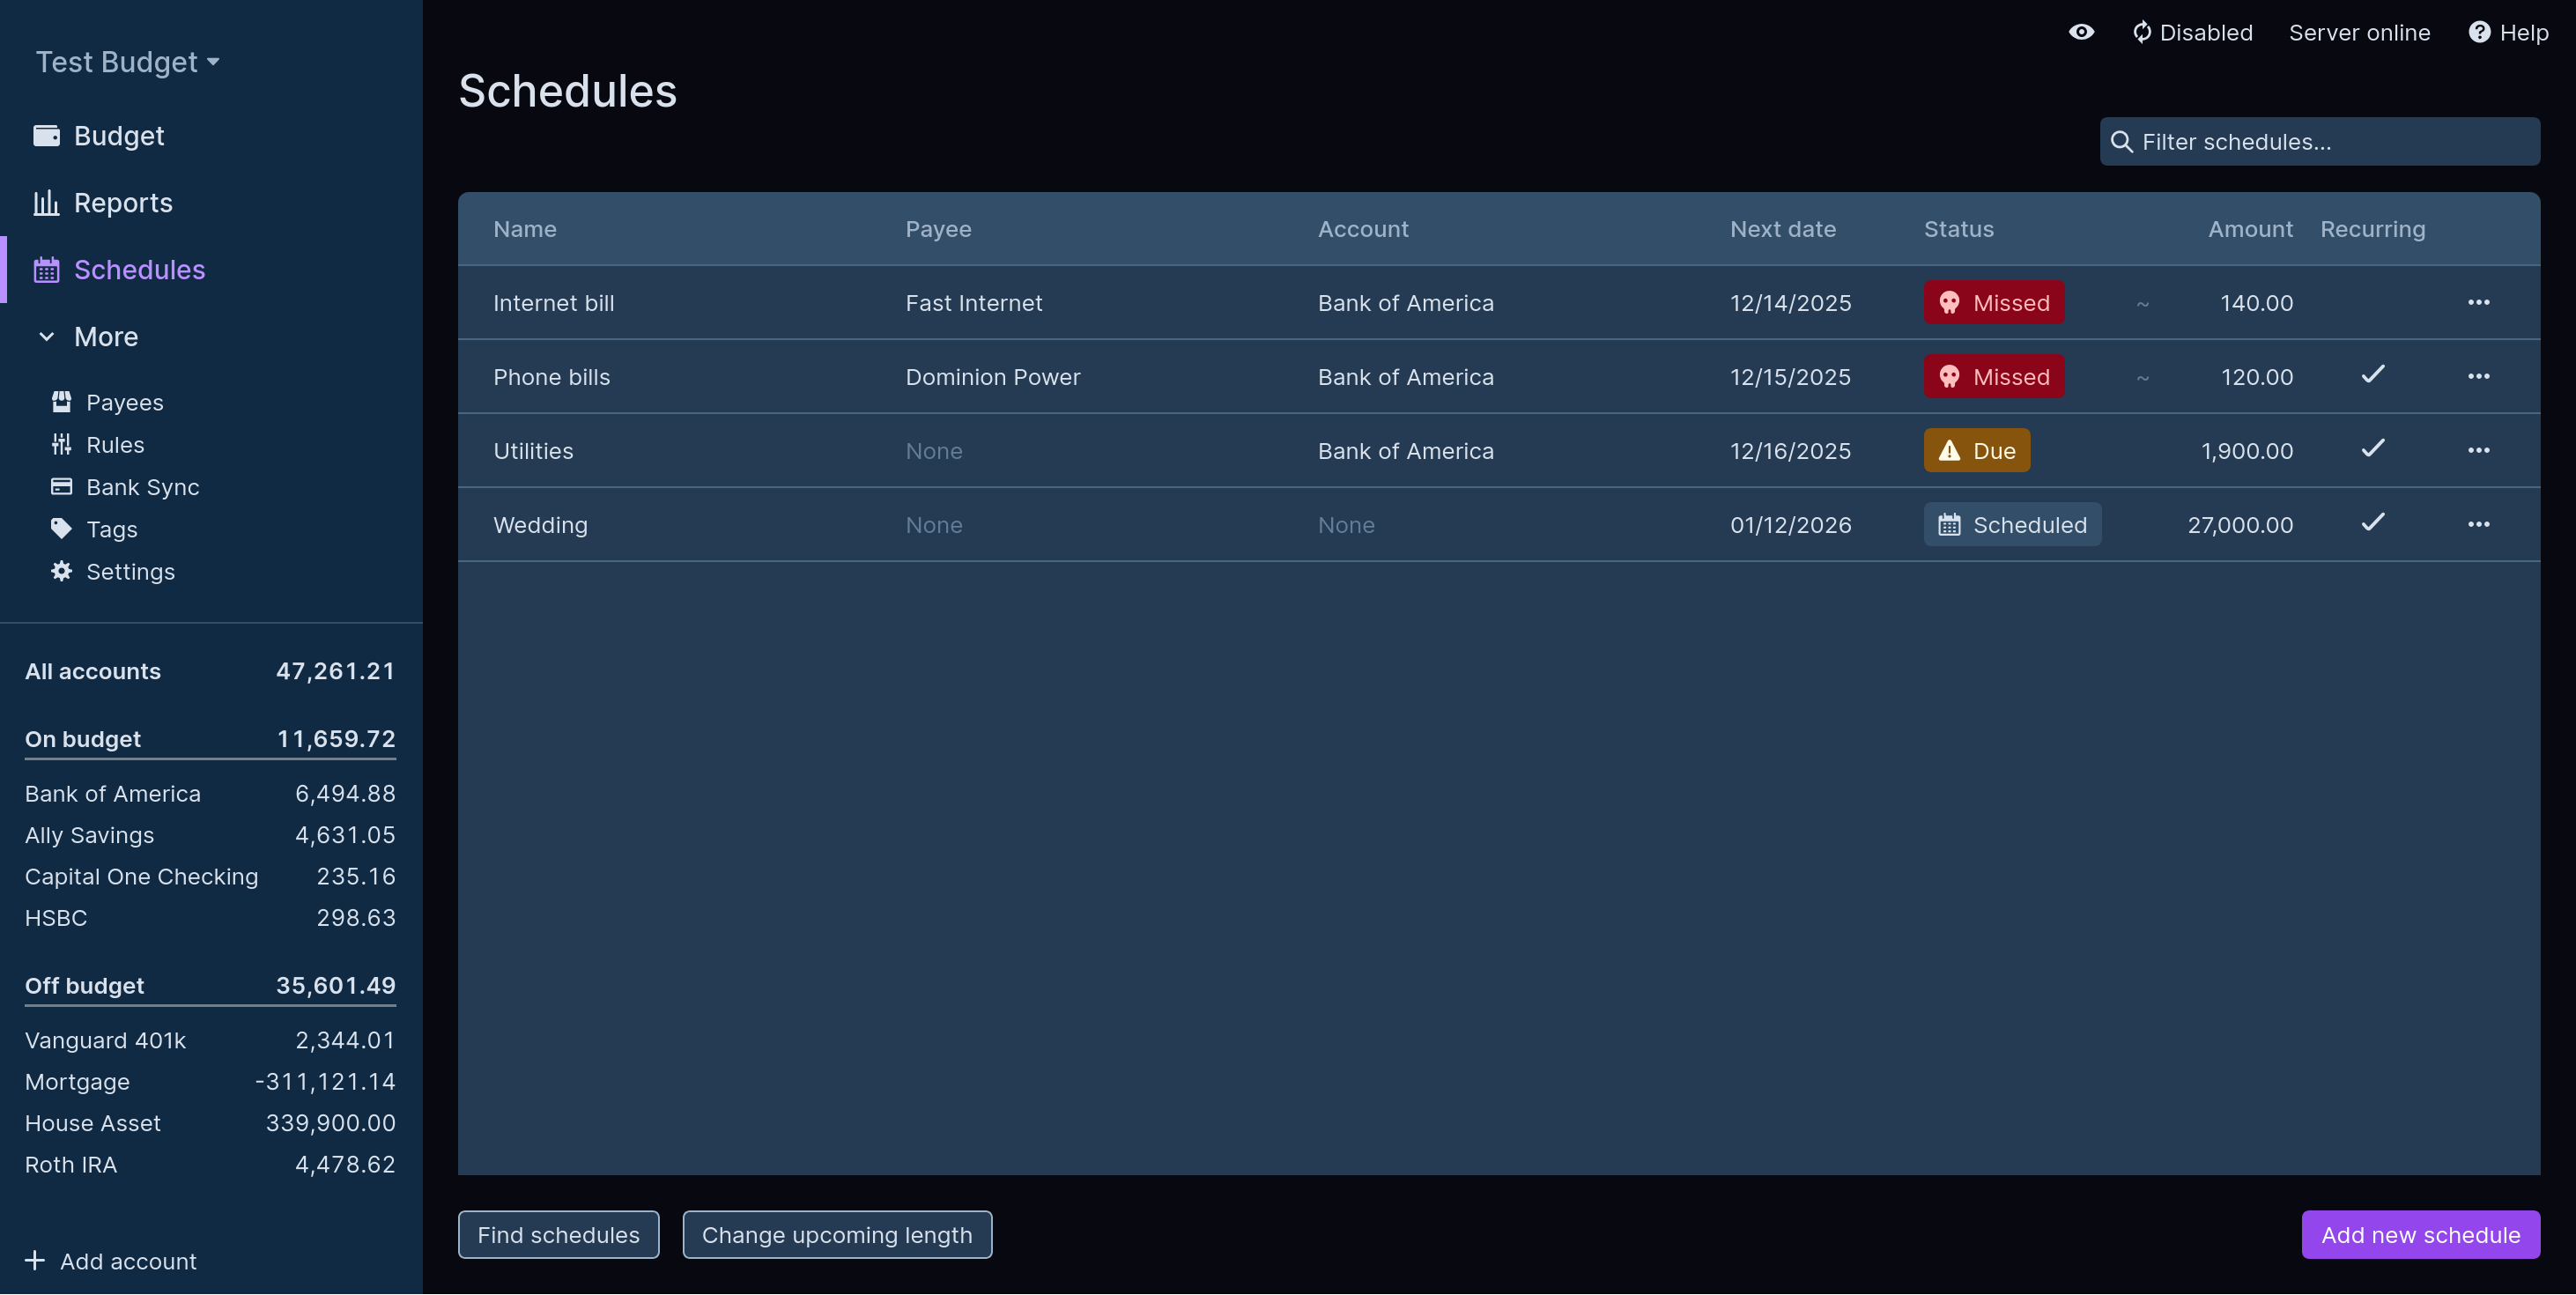
This is where you define recurring expenses, or just future ones like with the wedding (hopefully). Clicking on a schedule allows you to customize it as expected. There is a nice recurring scheduling UI. Good job, here.
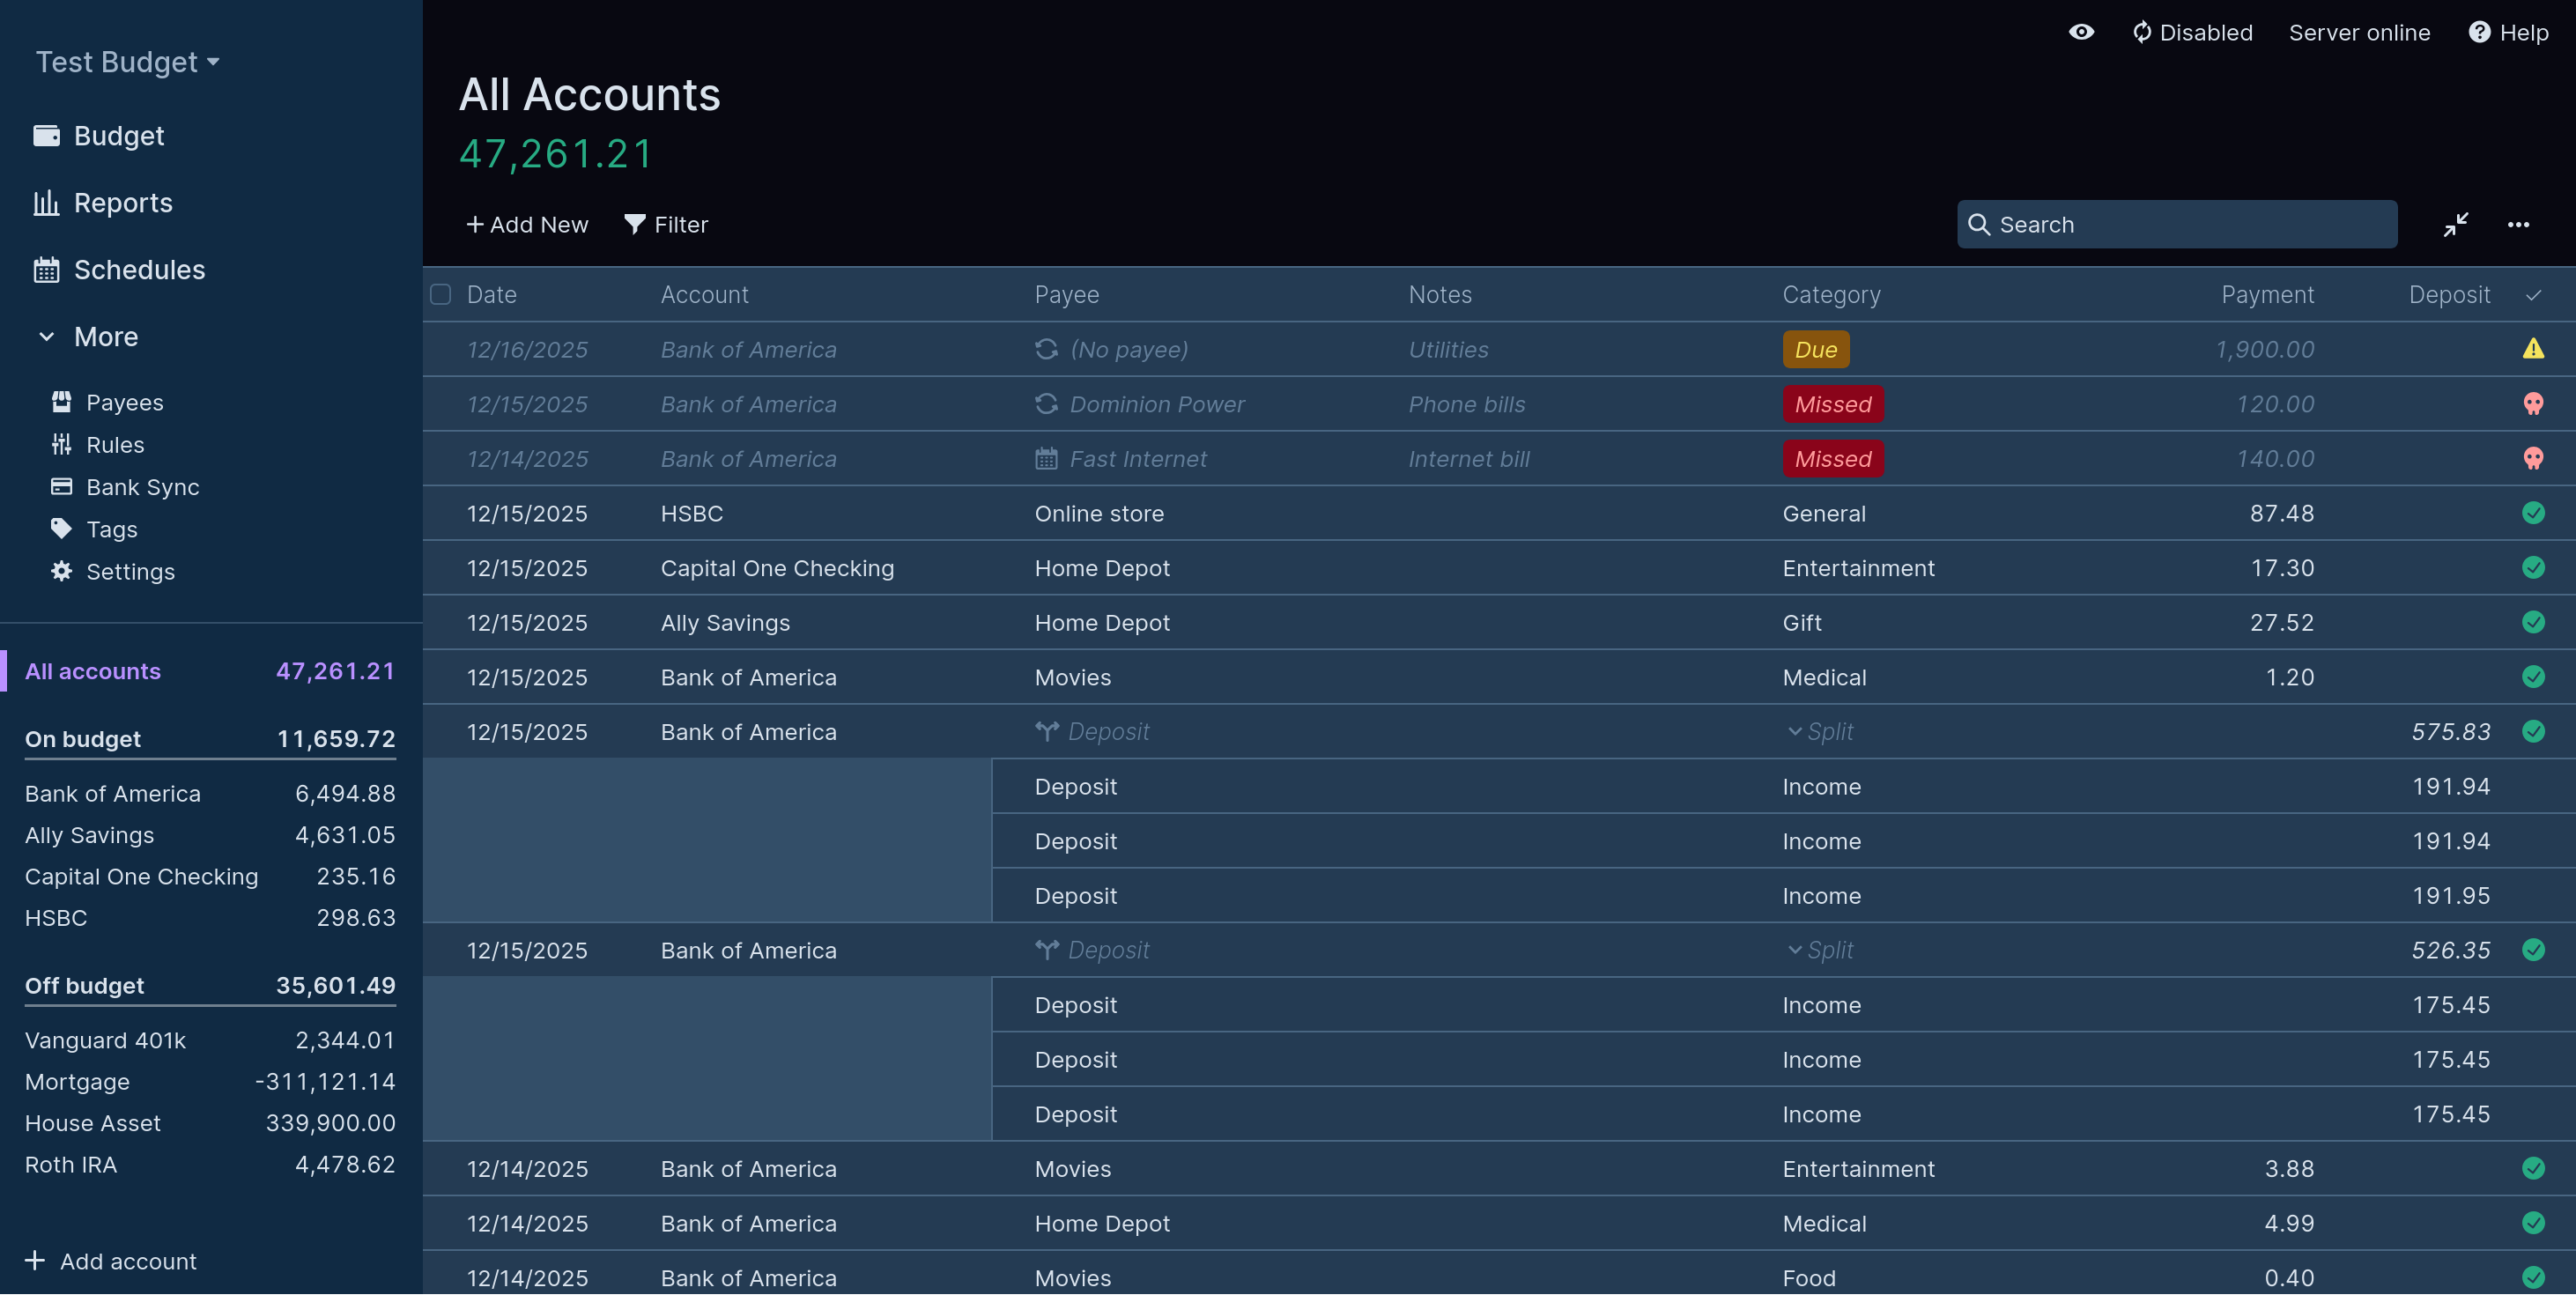
Clicking on the “All Accounts” button on the sidebar brings you to the global transactions list.
Let’s check out the “Rules” section that’s hidden under “More” in the sidebar.
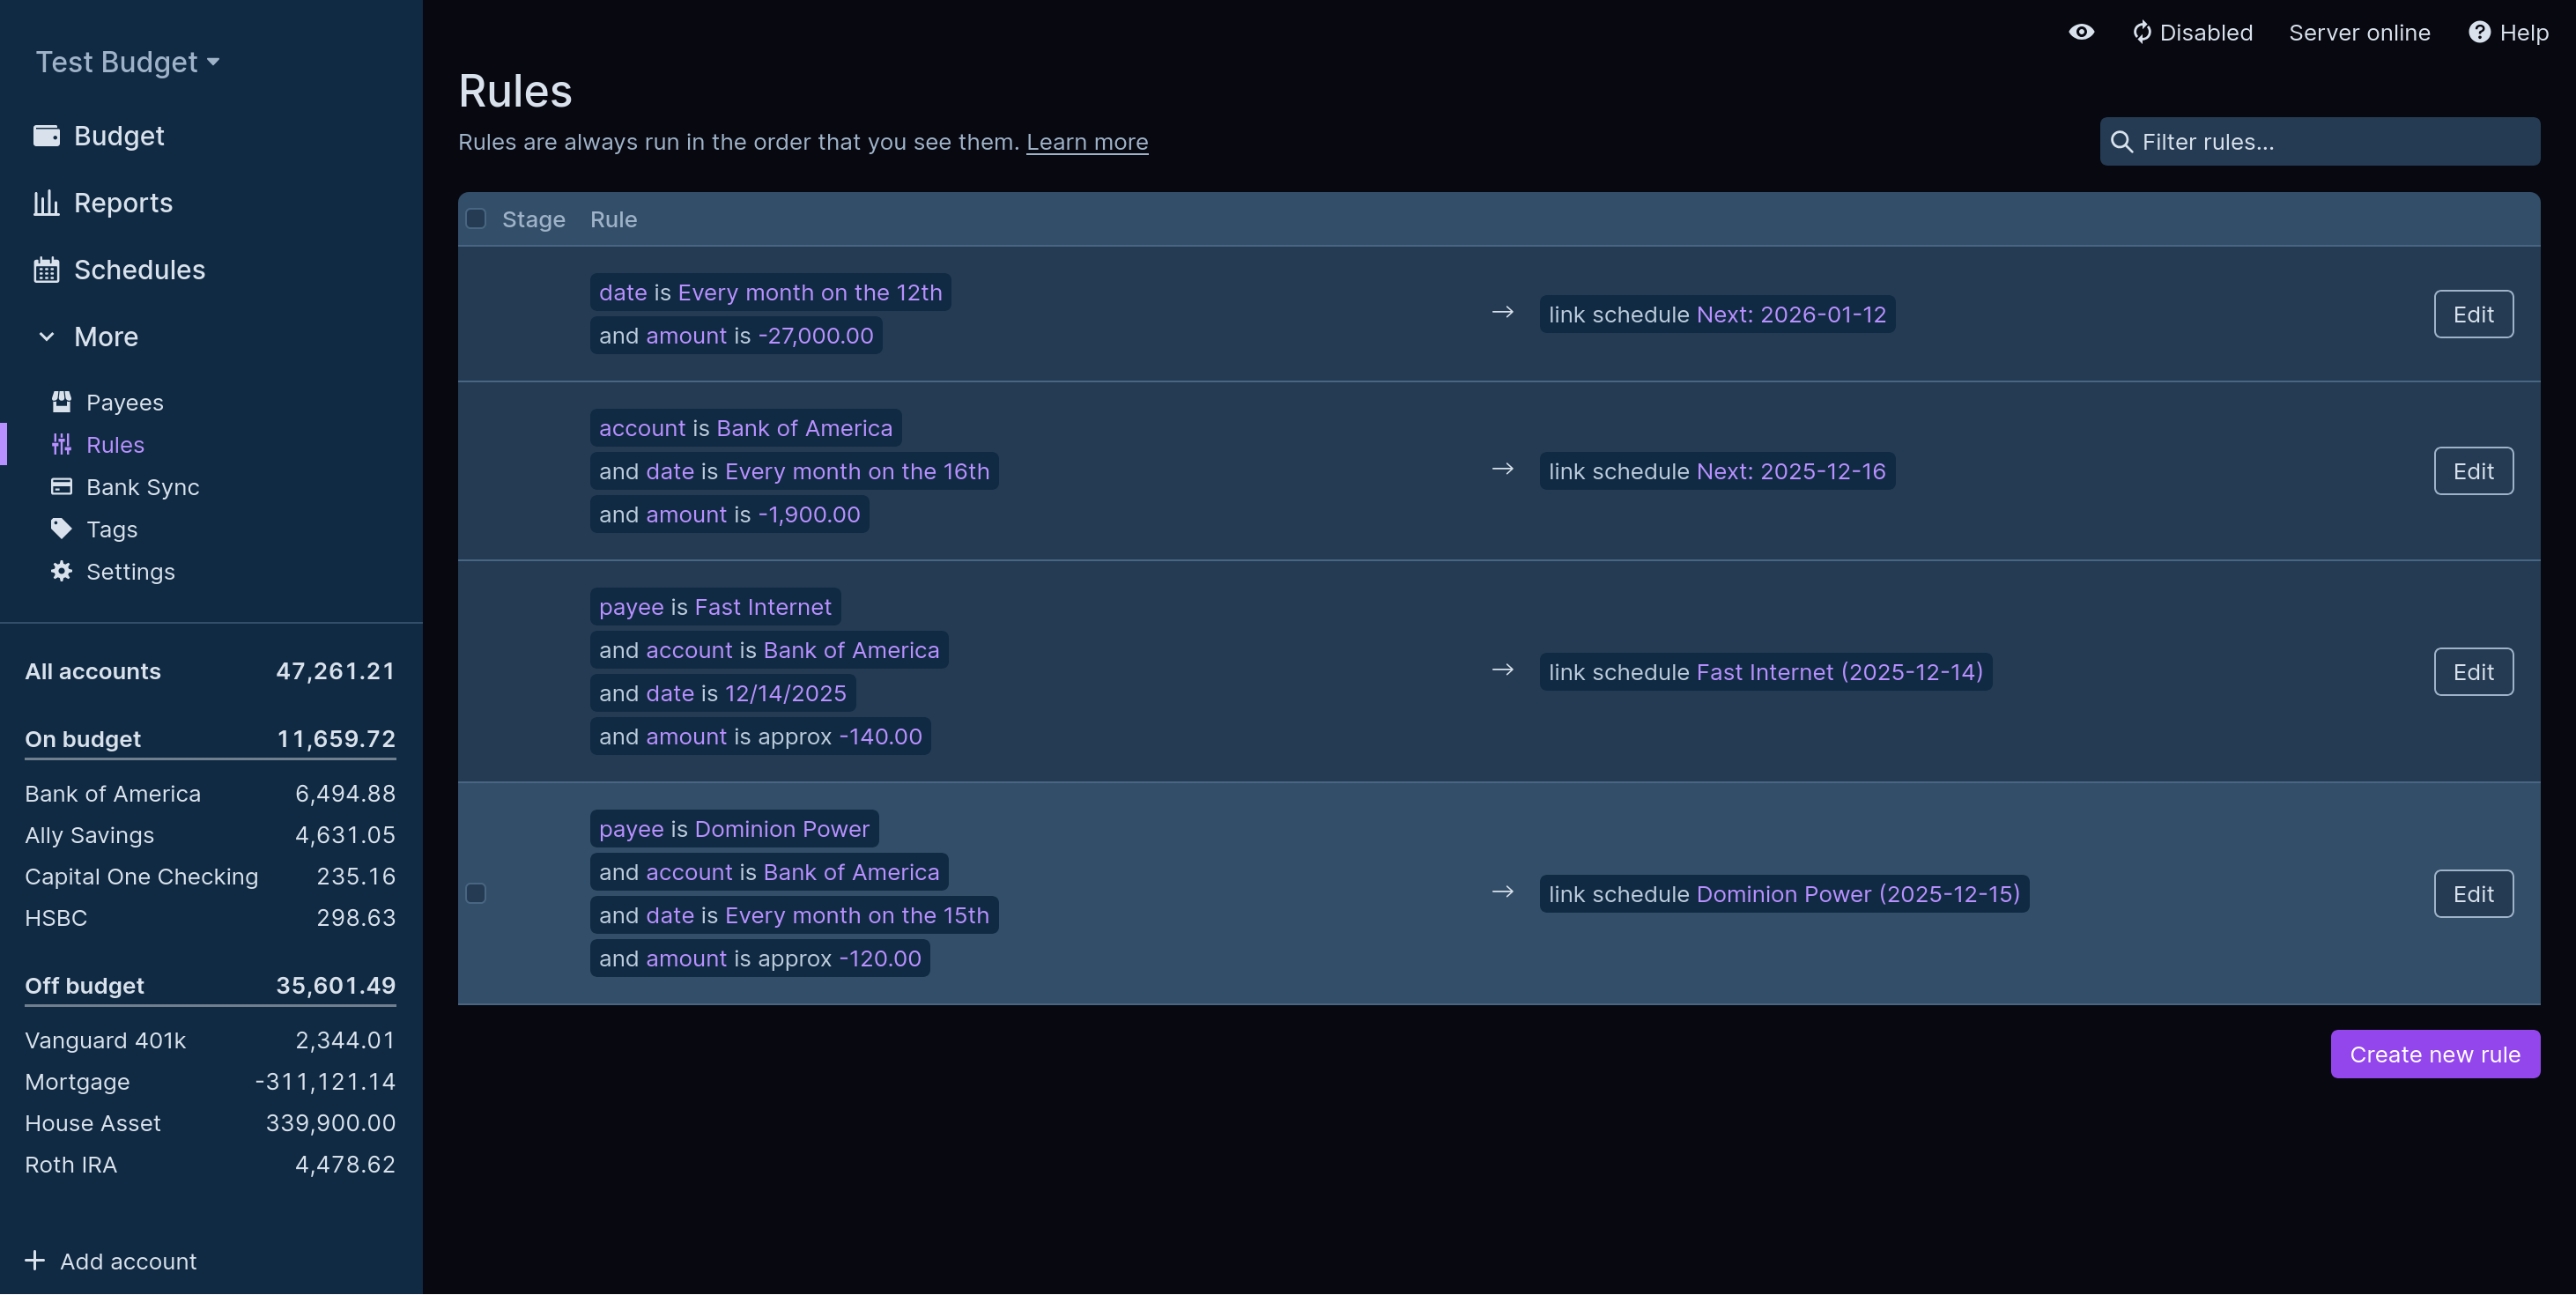
This seems quite powerful - basically we are not limited to recurring schedules for automation but can apply multiple actions to each transaction as it occurs.
One last thing to look at: Settings, again hidden under “More” for me.
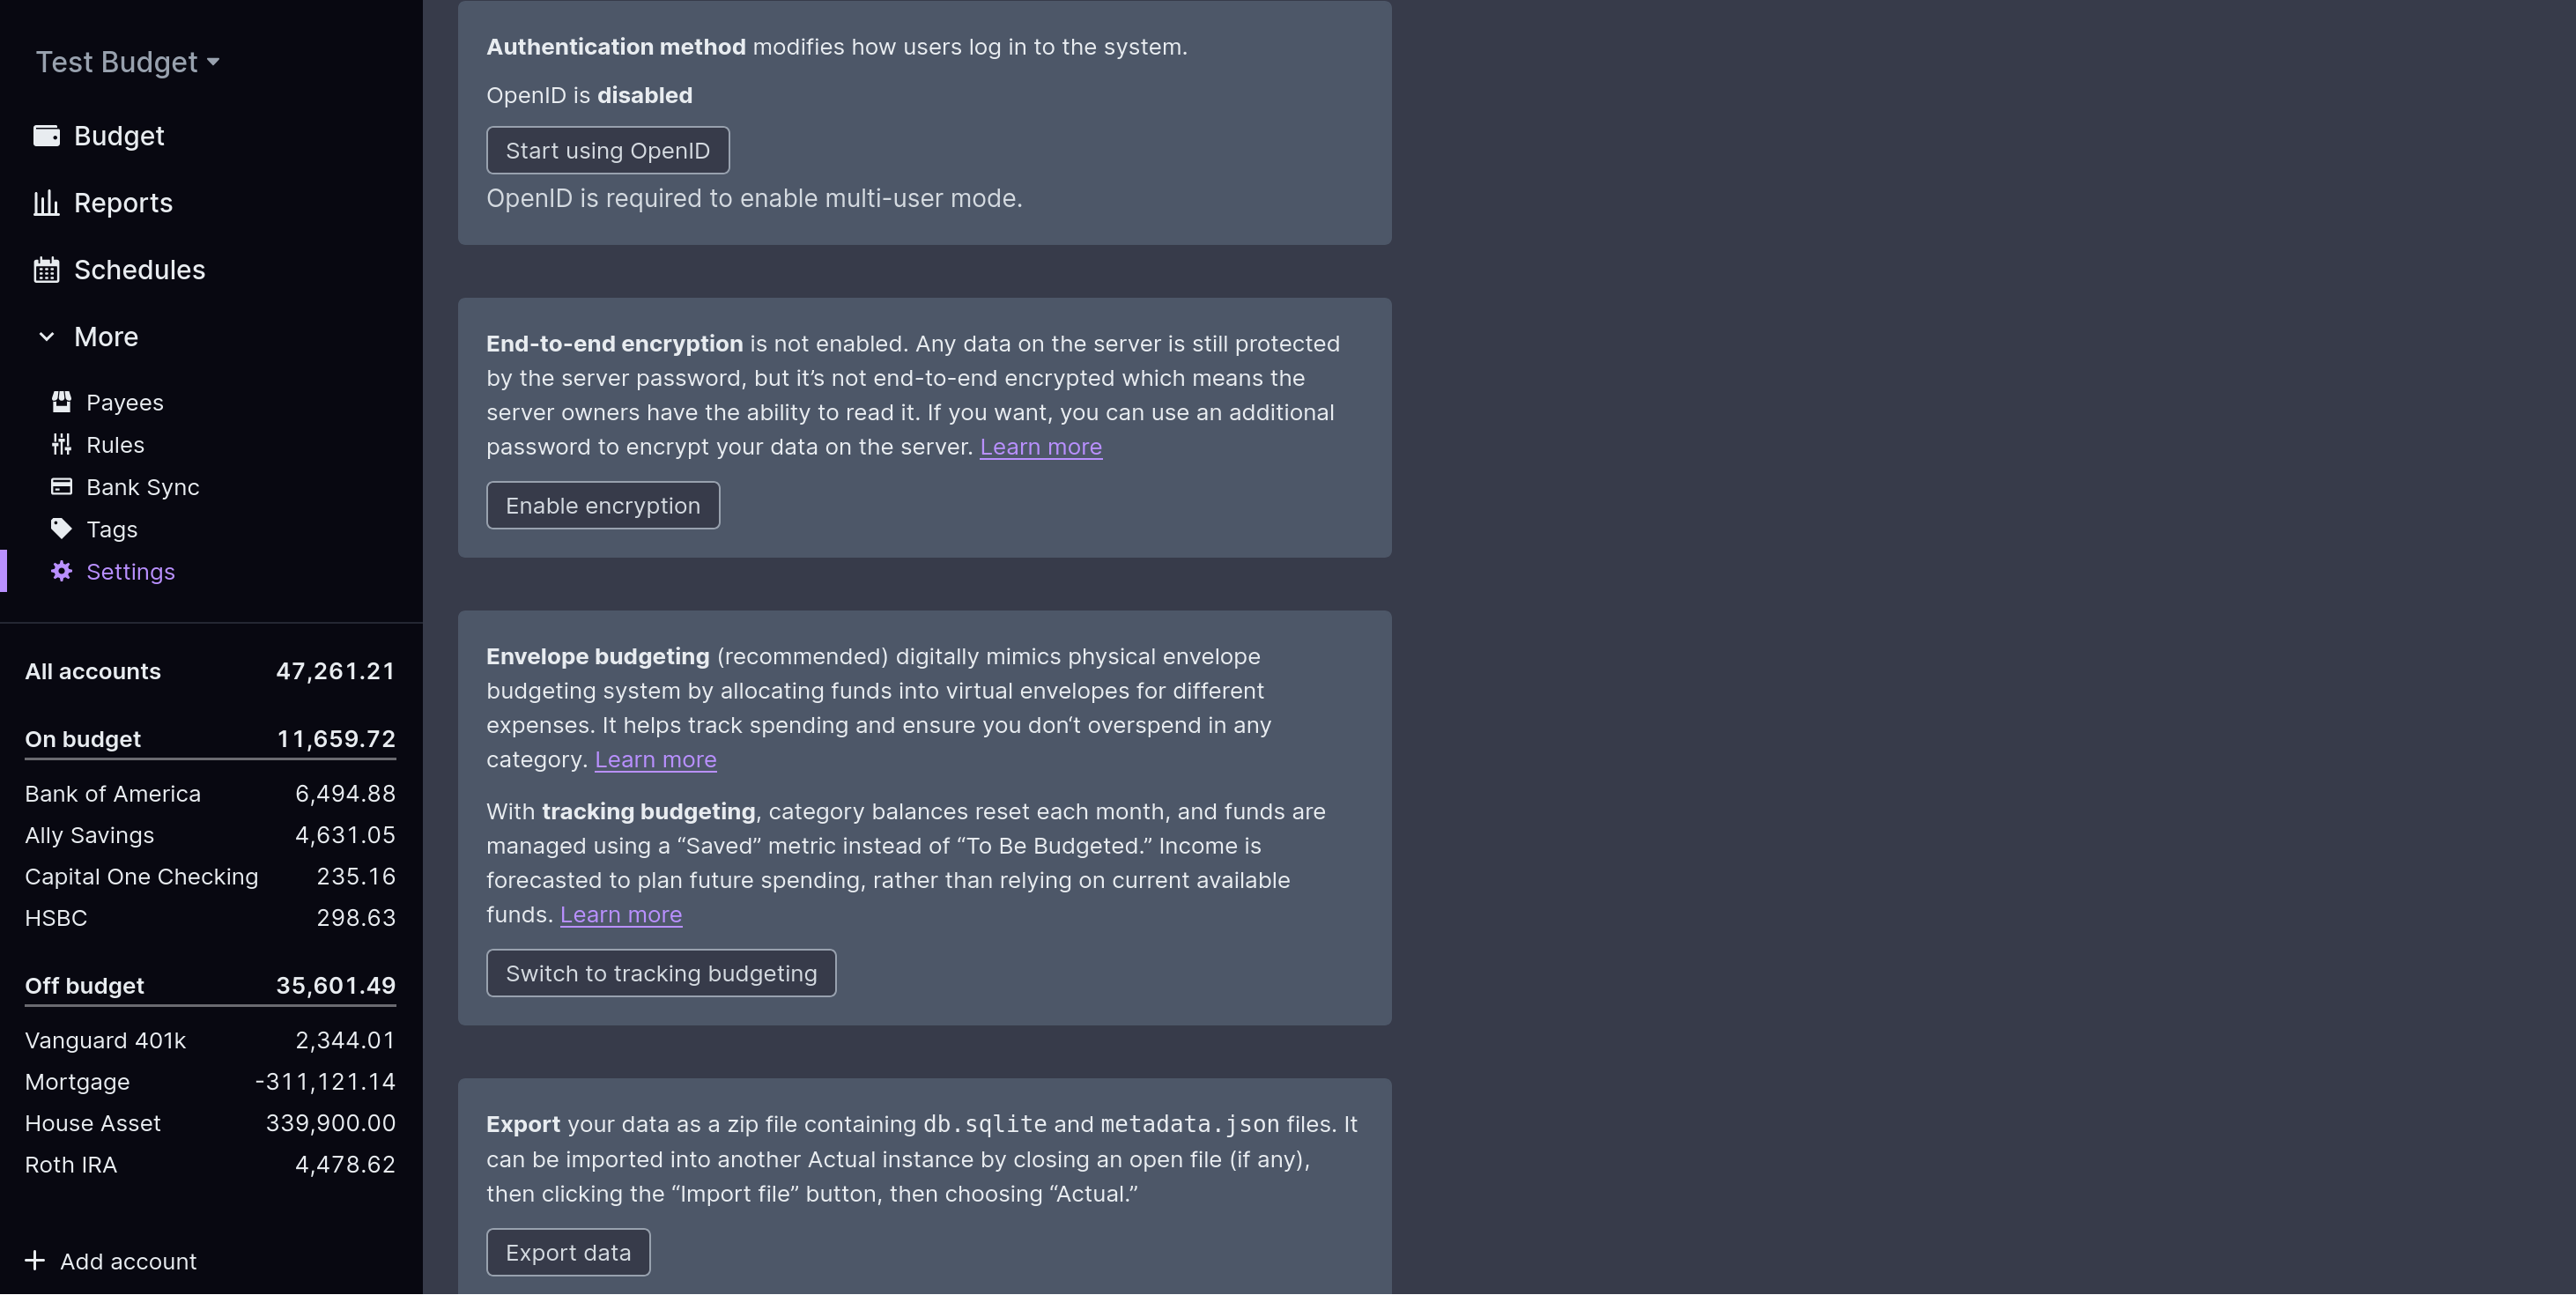
I don’t want to continue harping about this, but the UI seems inefficiently used again. The entire right half of the page is unutilized here, forcing you to scroll. A single-column layout can be “simpler” to understand but the small font size is making this look a lot more complicated than it needs to be.
Nevertheless, I quite like the options:
- Encryption can be enabled to encrypt the data at rest
- OpenID can be configured from the UI - so you can use pocket ID - which is much nicer than having to configure it during install. Good job, Actual!
- You can export your data as a SQLite file. Fair enough.
We end our tour here, but the stellar Actual docs have a fully documented tour for you if you want to peruse further.
Conclusion
Overall it was a very painless install and the application seems very complete in terms of features (coming from a non-budgeting-app-enthusiast) and has everything I could think of. There are some minor gripes for me, mainly about the onboarding experience and the UI’s space inefficiency, but they are decidedly minor. I quite like a dense interface for data-first applications, but subtle changes like making the Reports view the default landing page may be a wise move for Actual.
What I have no complaints about is their documentation
. It is very well written and organised, and includes a full tour, as well as tutorials on budgeting itself. The search on the site is not the best but using Google’s site: helper I was able to find answers to all my questions there.
Thanks for reading this far, and follow along for future posts in #Self-hostember . You can now follow us on Mastodon to keep up to date with us as well!