Self-Hostember #0: Initial Setup
Hi and welcome to a series of more than twenty but less than thirty-two daily things that you can self-host.
Because we’d like to focus on things that you (and friends or family) can use and not too much tech stuff for its own sake, let’s warm up by getting a machine basically ready for the next steps. We’re going to install a reverse proxy (Caddy) and Docker.
We’re going to assume that you’re using Debian 13 (Trixie) because it respects your rights, and that you’re using a hosting environment that’s more-or-less like Colocataires (that’s us , a very small hosting company in Ottawa, Canada). That means that you have at least an IPv6 address with access to the Internet (and NAT64 so you can reach the IPv4 parts of the Internet) or that you have a routable IPv4 address directly assigned to your machine.
Nothing in this series is Colocataires 🇨🇦 specific: you should be able to follow along with a Lagrange Cloud instance 🇬🇧, Hetzner VM 🇩🇪 or a DigitalOcean droplet 🇺🇲. Just make sure it’s running Debian Trixie unless you’re happy to translate to your Linux of choice.
We’re also going to assume familiarity with using SSH and a terminal-based text editor like nano, vim or emacs.
Become root
Unlike Ubuntu, Debian does not ship with sudo by default, so you’ll need to either log in as root directly or use su to become root with the root password. (Debian will not permit you to log in as root via SSH using a password, so if you don’t have an SSH key set up, switching users is your only option).
insom@debian13:~$ su
Password:
root@debian13:~#
Install Docker CE
We’re going to install Docker CE, a binary build from the official source. Debian already has packages for docker.io (usually an older version) as well as podman (a mostly compatible Docker replacement), but using the official Docker will maximize compatibility. This way we’ll spend more time trying out self-hosted software than debugging it.
These are abridged steps taken from docker.com .
We add Docker’s gnupg key and tell apt to search its repository for packages:
apt update
apt install ca-certificates curl
install -m 0755 -d /etc/apt/keyrings
curl -fsSL https://download.docker.com/linux/debian/gpg -o /etc/apt/keyrings/docker.asc
chmod a+r /etc/apt/keyrings/docker.asc

tee /etc/apt/sources.list.d/docker.sources <<EOF
Types: deb
URIs: https://download.docker.com/linux/debian
Suites: trixie
Components: stable
Signed-By: /etc/apt/keyrings/docker.asc
EOF

apt update
apt install docker-ce docker-ce-cli containerd.io \
  docker-buildx-plugin docker-compose-plugin
For convenience, let’s install sudo and caddy, and add our user to some privileged groups so we don’t need to run too many commands directly as root. (My user is insom, yours is almost certainly something else!)
apt install caddy sudo

# These groups will let us issue docker commands as a regular user,
# to su, to restart systemd units and to use sudo to temporarily become root.
usermod -aG docker,root,sudo insom
You’ll need to log out of your SSH session and log back in as your user to see your new groups:
insom@debian13:~$ id
uid=1000(insom) gid=1000(insom) groups=1000(insom),0(root),24(cdrom),25(floppy),27(sudo),29(audio),30(dip),44(video),46(plugdev),100(users),101(netdev),104(docker)
You can check that everything worked by running the “Hello, World” container as your regular user:
docker run hello-world
Wildcard DNS
As we’re going to try out a few applications, most of which are webapps, it will be easier to have a wildcard record point at the server.
(Alternatively you can set up a single A record (for IPv4) or AAAA record (for IPv6) each time you try out an application – just make sure you add the DNS entry before adding it to Caddy’s config file or requesting a TLS certificate will fail!).
How you do this is going to differ based on who you have your domain registered with (or your DNS provider, if those aren’t the same company).
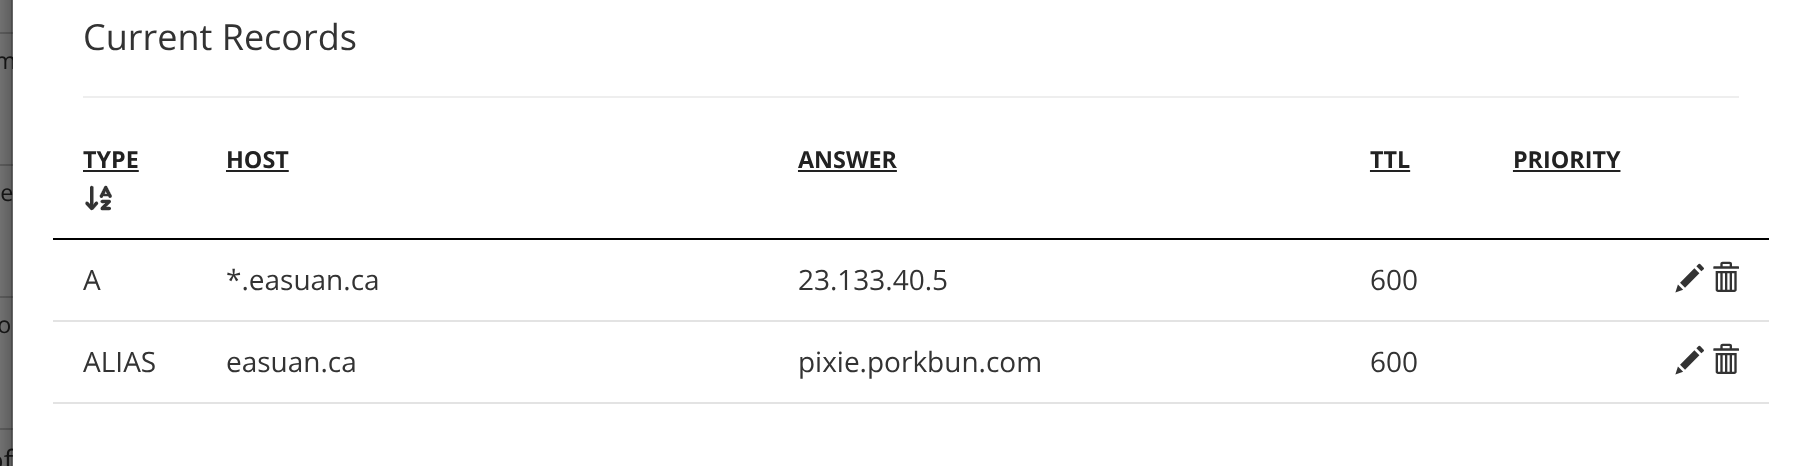
In my case, I register domains with Porkbun
, so I’ll login to the control panel, select my domain and set up a record pointing anything at easuan.ca to my IPv4 address, 23.133.40.5:

In this case, there’s only two records for this domain, yours might look different, but make sure that your wildcard is there.
If you want to check “for real” if it’s added, you can always ping blablah.yourdomain.ca from your own machine to see if it resolves to a real IP:
XIII:~$ ping numberonecrush.easuan.ca
PING numberonecrush.easuan.ca (23.133.40.5) 56(84) bytes of data.
64 bytes from numberonecrush.easuan.ca (23.133.40.5): icmp_seq=1 ttl=58 time=13.1 ms
^C
Caddy
There’s a lot of reverse proxy options, but I am just going to pick Caddy. I personally use it, I think that it’s got a friendly syntax and it’s secure by default.
You can overwrite the default /etc/caddy/Caddyfile with something like:
{
    email email@example.com
    # This will be used for your Let's Encrypt account when it's time
    # to register TLS certificates. It should be a real address that
    # you can be reached at!
    servers {
        protocols h1 h2
        # HTTP/3 support breaks some Mastodon features and I'm not
        # convinced it helps normal Internet users, so I've excluded it.
    }
    default_bind [::]
}

# A test domain to ensure everything so far has worked
test.easuan.ca {
    root * /var/www/test
    file_server
}
Then let’s test the whole thing and put a default website on that test domain:
sudo mkdir -p /var/www/test
echo "She'll be right" | sudo tee /var/www/test/index.html
sudo systemctl restart caddy
And verify it from our own machine:
XIII:~$ curl test.easuan.ca
She'll be right
XIII:~$
🎉
That was a fair bit of work, but everything after this will be easier or, at least, it’ll be more fun.
Follow along with future posts in the #Self-Hostember tag.